Proxies ativos e passivos
Independentemente de você querer instalar um proxy ativo ou passivo, grande parte das etapas de instalação e configuração são as mesmas.
Configuração da GUI do Zabbix
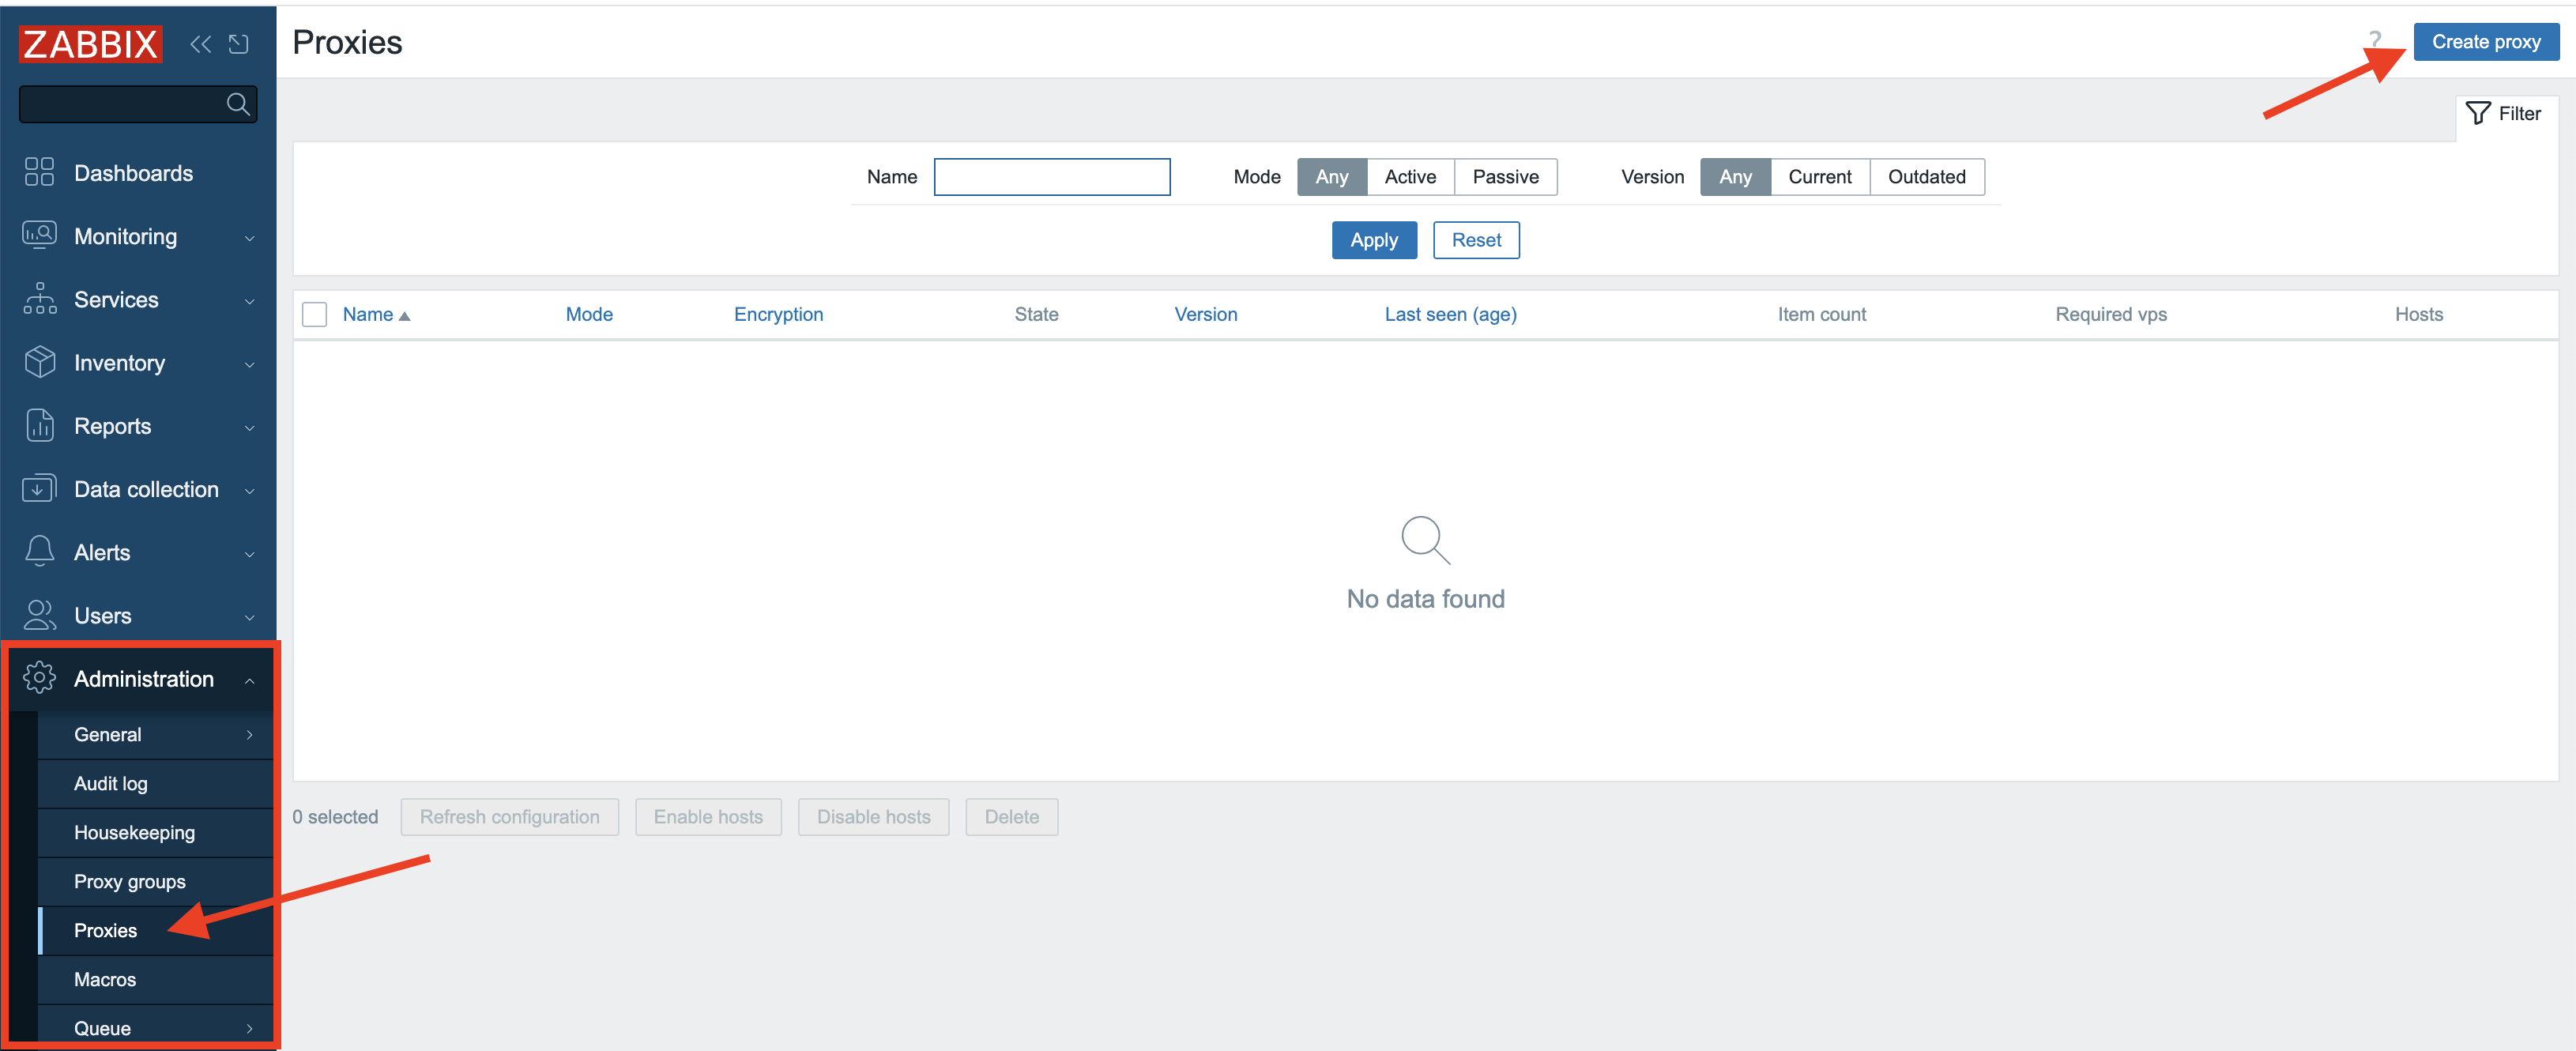
Há duas coisas que precisamos fazer quando queremos configurar um proxy Zabbix e
uma dessas etapas é adicionar o proxy no frontend do Zabbix. Então, no menu,
vamos selecionar Administration => Proxies e clicar no canto superior
direito em Create proxy.
3.3 Criar proxy
Uma vez pressionado, um novo formulário modal será exibido, no qual precisaremos preencher algumas informações.
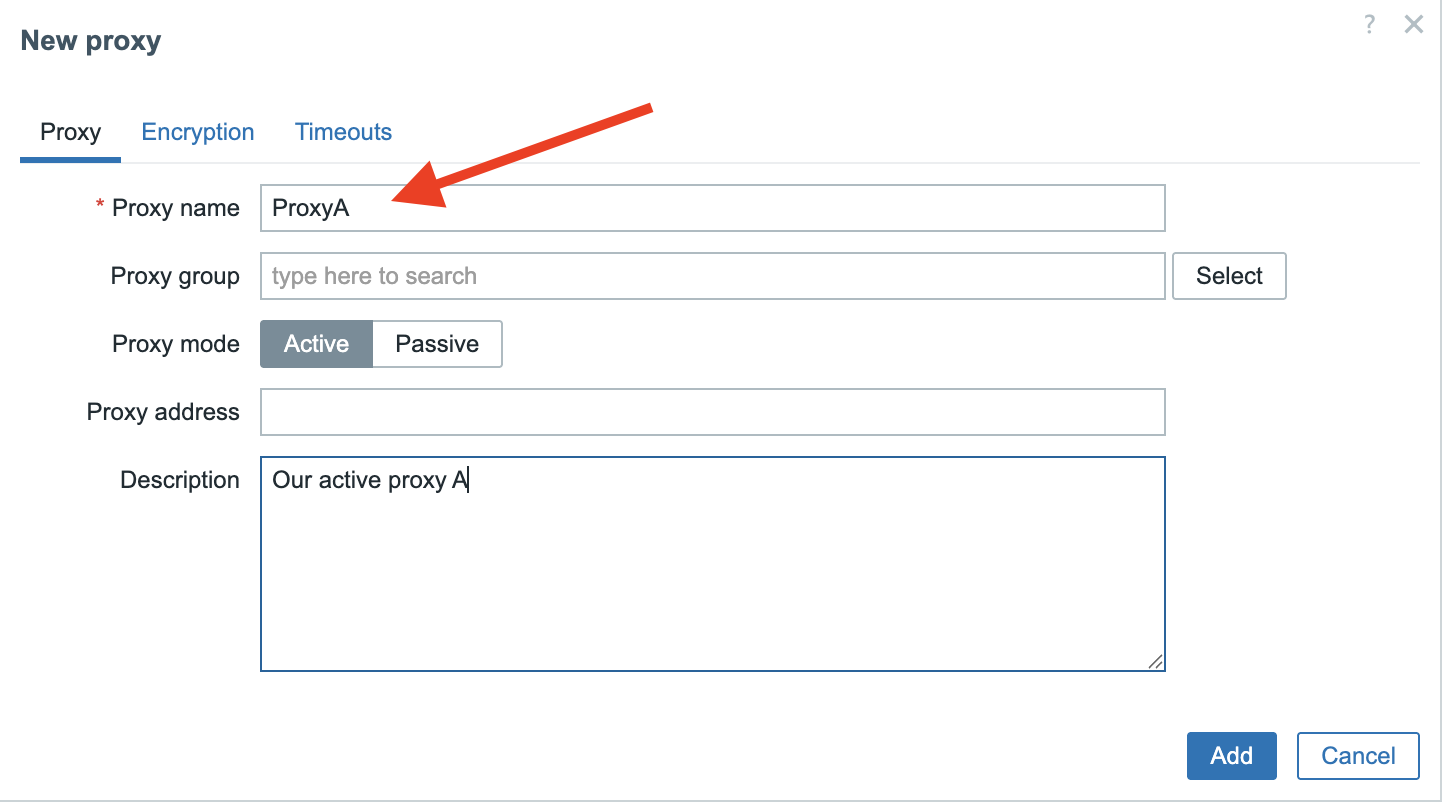
Proxy ativo
Para proxies ativos, só precisamos digitar o campo Proxy name. Aqui,
digitaremos ProxyA para nos lembrar de que esse será um proxy ativo. Não se
preocupe com os outros campos, pois eles serão abordados posteriormente. No
campo Description, você pode inserir algum texto para deixar ainda mais claro
que este é um proxy ativo.
Nota
For Zabbix active proxies, you only need to specify the hostname during configuration. This hostname acts as the unique identifier that the Zabbix server uses to distinguish between different active proxies and manage their data correctly.
3.4 Novo proxy
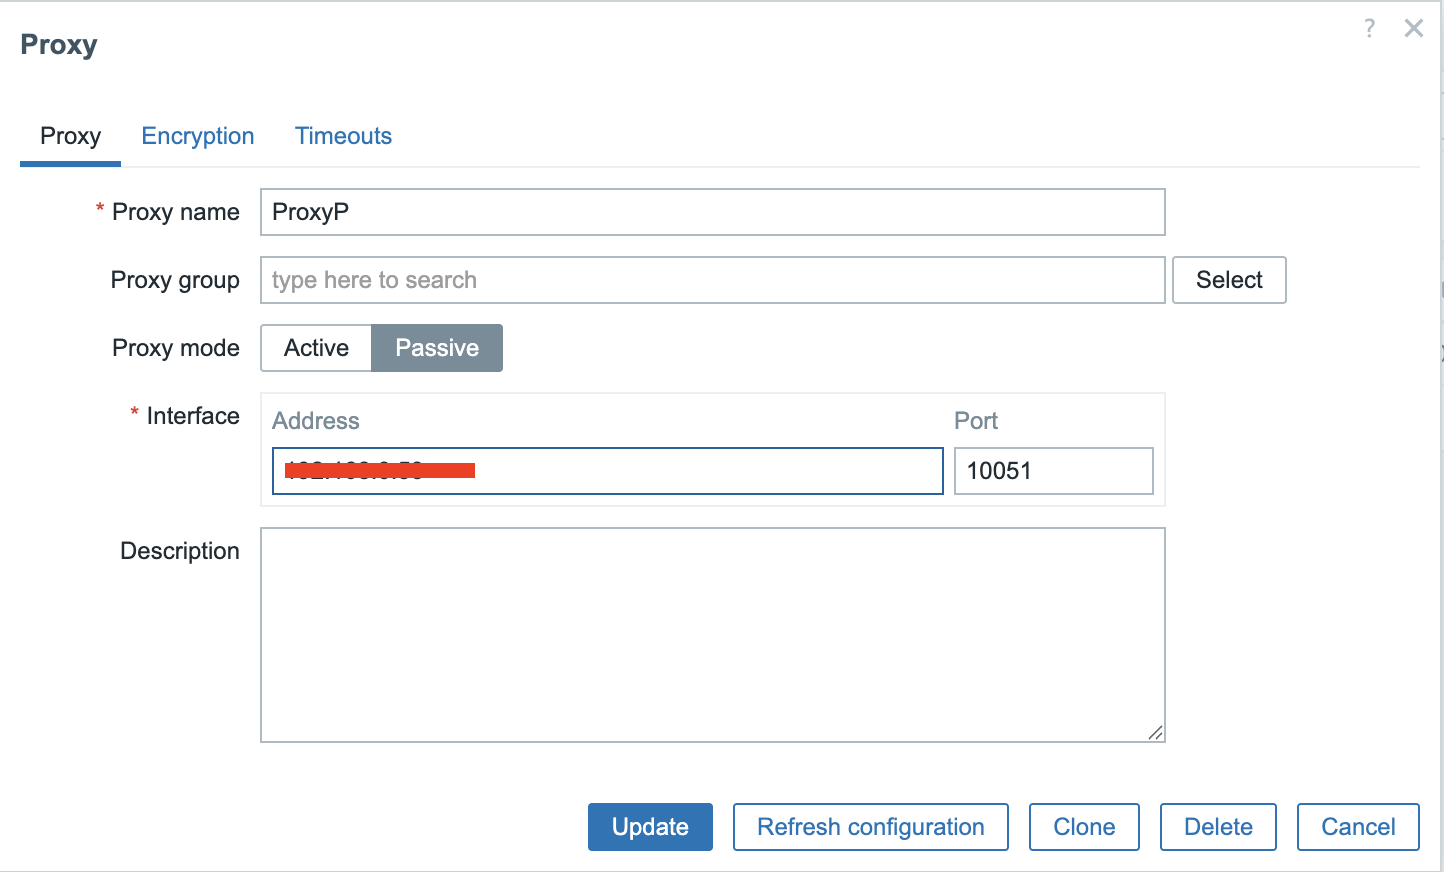
Proxy passivo
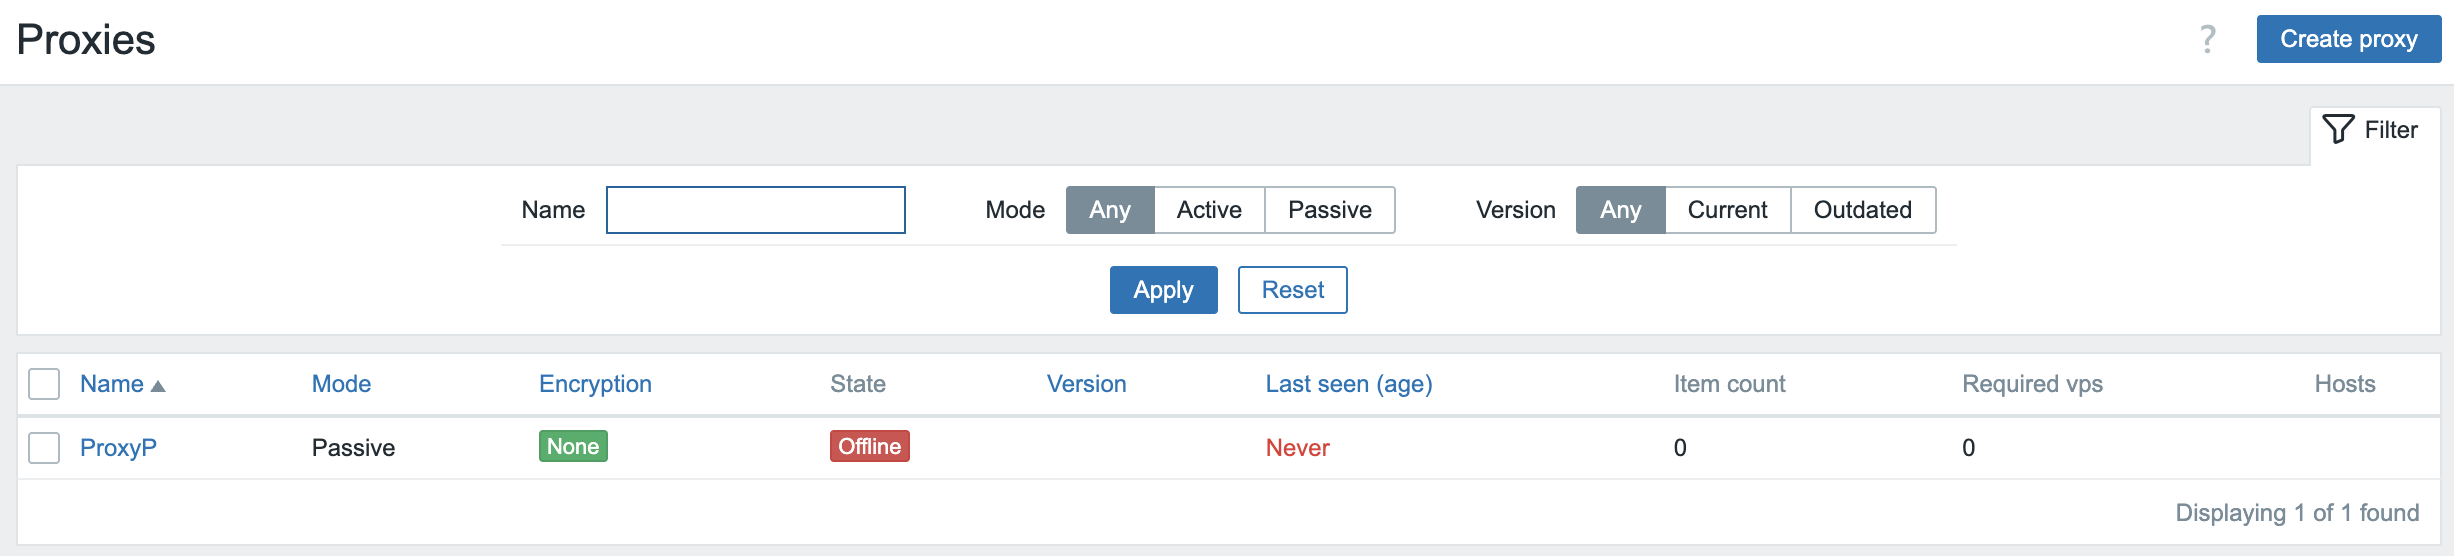
Para o proxy passivo, digitaremos ProxyP como Nome do proxy, mas agora
também precisamos especificar o campo Interface. Aqui adicionamos o IP do host
em que nosso proxy é executado. Você também notou que usamos a mesma porta
10051 que o servidor Zabbix __ para nos comunicarmos com o nosso proxy.
3.5 Novo proxy passivo
Instalando o proxy
Em seguida, precisamos colocar o software proxy Zabbix em um sistema que funcionará como Zabbix Proxy. Configure um novo sistema ou VM e certifique-se de que ele atenda aos requisitos descritos no capítulo Vamos começar: Requerimentos.
Como o proxy do Zabbix é, na verdade, um pequeno servidor Zabbix, também precisamos nos certificar de que o sistema esteja preparado para o Zabbix, conforme descrito em Preparando o servidor para o Zabbix.
Agora que seu sistema está pronto e sabe onde encontrar os pacotes de software Zabbix, podemos realmente instalar o software Zabbix Proxy. É bastante simples, mas há uma coisa que precisamos decidir antecipadamente. Os proxies do Zabbix precisam de um local para armazenar suas informações e podem usar uma destas três opções: MySQL/MariaDB, PostgreSQL ou SQLite3.
Abordaremos apenas o SQlite, pois o MySQL e o PostgreSQL já foram abordados no capítulo Zabbix componentes e instalação: Database.
Nota
The only thing that is a bit different when you setup a MySQL or PostgreSQL database for use with a Zabbix Proxy instead of a Zabbix Server are the scripts you will need to setup the DB structure.
- For MySQL/MariaDB they are located in
/usr/share/zabbix/sql-scripts/mysql/proxy.sql. - For PostgreSQL they can be found in
/usr/share/zabbix/sql-scripts/postgresql/proxy.sql.
Instalar zabbix-proxy-sqlite3
Red Hat
SUSE
Ubuntu
Dica
If you want to use MySQL or PostgreSQL then you can use the package zabbix-proxy-mysql
or zabbix-proxy-pgsql depending on your needs.
Configuração do proxy
Agora que instalamos os pacotes necessários, ainda precisamos fazer algumas alterações na configuração.
Assim como no servidor Zabbix (ou no agente, nesse caso), o arquivo de configuração oferece uma opção para incluir arquivos de configuração adicionais para parâmetros personalizados. Em geral, e especialmente em um ambiente de produção, é melhor evitar alterar diretamente o arquivo de configuração original. Em vez disso, você pode criar e incluir arquivos de configuração separados para quaisquer parâmetros adicionais ou modificados.
No SUSE 16 e posterior, esse recurso já está ativado e configurado por padrão em
/usr/etc/zabbix/zabbix_proxy.conf.
Em outras distribuições, talvez seja necessário ativá-lo manualmente em
/etc/zabbix/zabbix_proxy.conf.
Para ativar esse recurso, certifique-se de que a próxima linha exista e não
esteja comentada (com um # na frente dela):
O caminho /etc/zabbix/zabbix_proxy.d/ já deve ter sido criado pelo pacote
instalado, mas verifique se ele realmente existe.
Agora, criaremos um arquivo de configuração personalizado general.conf neste
diretório /etc/zabbix/zabbix_proxy.d/ que conterá algumas configurações gerais
de proxy:
-
A primeira opção que teremos de definir é
ProxyMode:- Defina isso como
0para um proxy Ativo. - Defina isso como
1para um proxy Passivo.
- Defina isso como
-
A outra opção importante é a
Server, cujo padrão é127.0.0.1, portanto, precisamos substituí-la pelo IP ou nome DNS do nosso Zabbix Server.
Nota
You can fill in multiple servers here in case you have more than one Zabbix Server
connecting to your proxy. Also the port can be added here in case your server
listens on another port then the standard port 10051. Just be careful to not
add the IP and DNS name for the same server as this can return double values.
-
Outra opção importante é
Hostname, especialmente em um proxy Active. Lembre-se de que, em nosso frontend, demos ao nosso proxy Active o nomeProxyA, portanto, agora temos que preencher exatamente o mesmo nome aqui para o hostname. Assim como um agente Zabbix no modo active _ Zabbix server_ usará o nome como um identificador exclusivo.\ Para um proxy passivo, essa opção é menos importante, mas, para maior clareza, é melhor mantê-la igual:ProxyPno nosso caso. -
Em um_Proxy ativo_ , você também pode considerar a configuração de
ProxyConfigFrequencyeDataSenderFrequencypara ajustar a comunicação com o Servidor Zabbix , mas, de modo geral, os padrões devem ser suficientes. -
Outras opções a serem consideradas são
ProxyOfflineBuffereProxyLocalBufferpara garantir que o proxy possa acompanhar as interrupções do servidor Zabbix e a quantidade de dados monitorados que ele ingere.
O arquivo general.conf agora deve ter pelo menos a seguinte aparência:
Para definir as configurações do banco de dados, crie um arquivo de configuração
dedicado em /etc/zabbix/zabbix_proxy.d/database.conf. Esse arquivo conterá os
parâmetros de conexão do banco de dados.
Para implementações do SQLite3, apenas o parâmetro DBName requer configuração,
especificando o caminho para o arquivo de banco de dados. O Zabbix Proxy criará
e utilizará automaticamente esse arquivo de banco de dados em sua inicialização.
Você pode escolher qualquer local para o arquivo de banco de dados, mas deve se certificar de que o diretório existe e pode ser gravado pelo processo do Zabbix proxy.
Em nosso exemplo, escolhemos o home-dir padrão do zabbix-user conforme
configurado pelos pacotes do Zabbix. Você pode verificar o diretório inicial do
usuário em seu host usando o comando getent passwd:
Exemplo "Verifique o homedir padrão do usuário zabbix"
```shell-session
localhost:~>getent passwd zabbix
zabbix:x:476:476:Zabbix Monitoring System:/var/lib/zabbix:/sbin/nologin
```
Verifique se o diretório existe com as permissões corretas e o contexto do SELinux:
Verificar a existência do diretório inicial do zabbix
Se o diretório não existir, não for de propriedade do usuário zabbix ou não
tiver o rótulo SELinux zabbix_var_lib_t, será necessário corrigir isso:
Criar diretório inicial do zabbix
Dica
See Advanced security: SELinux chapter for more details about SELinux and Zabbix.
MariaDB/MySQL ou PostgreSQL como banco de dados para o proxy Zabbix
If you chose to use MariaDB/MySQL or PostgreSQL, please refer to Installing the Zabbix server for the required database
settings you will need to set in the /etc/zabbix/zabbix_proxy.d/database.conf-file.
Dica
A list of all configuration options can be found in the Zabbix documentation. https://www.zabbix.com/documentation/current/en/manual/appendix/config/zabbix_proxy
Um parâmetro de configuração importante que foi adicionado em 7.0 é
ProxyBufferMode, que determina como os dados de monitoramento coletados são
armazenados pelo proxy antes de serem encaminhados ao servidor Zabbix.
Possíveis modos de buffer:
disk- Buffer de disco (padrão para instalações existentes anteriores ao- Zabbix 7.0)
-
Todos os dados são gravados no banco de dados do Zabbix Proxy imediatamente antes de serem enviados para o servidor Zabbix. Em caso de falha do proxy ou do sistema, todos os dados são mantidos e serão enviados ao servidor Zabbix assim que o proxy for iniciado novamente.
This is slower due to database I/O but is highly reliable.
memory- Buffer de memória-
Os dados são armazenados na RAM e não são gravados no disco. Isso garante que os dados sejam enviados ao servidor Zabbix o mais rápido possível, pois não há tempo de espera de E/S para o banco de dados envolvido. A desvantagem é que, quando o proxy ou o sistema trava e o proxy ainda tem dados no buffer, ainda não recebidos pelo servidor, esses dados serão perdidos. Além disso, quando o buffer da RAM transbordar (
ProxyMemoryBufferSize), possivelmente devido a uma explosão repentina de itens recebidos ou ao fato de o servidor Zabbix estar indisponível por algum tempo, os dados mais antigos serão removidos do buffer antes de serem enviados ao servidor Zabbix. hybrid- buffer híbrido (padrão para novas instalações desde o Zabbix 7.0)-
Os dados são armazenados principalmente na RAM, mas são gravados automaticamente no banco de dados quando o buffer de memória está cheio, quando os dados são muito antigos ou quando o proxy é interrompido. Isso garante que os dados sejam preservados no caso de o servidor Zabbix ficar inacessível por um longo período ou quando houver uma explosão de muitos itens recebidos, equilibrando assim a velocidade e a confiabilidade.
Aviso
In Proxies that where installed before 7.0 the data was first written to
disk in the database and then sent to the Zabbix server. For these installations
when we upgrade this remains the default behavior after upgrading to Zabbix
7.x or higher. It's now recommended for performance reasons to use the new
setting hybrid and to define the ProxyMemoryBufferSize.
Depois de fazer todas as alterações necessárias no arquivo de configuração, além
das que abordamos, só precisamos ativar o serviço e iniciar nosso proxy.
Obviamente, não se esqueça de abrir a porta do firewall 10051 no lado do
servidor Zabbix para o proxy ativo.
Se tudo correr bem, podemos verificar o arquivo de registro do nosso proxy e veremos que o Zabbix criou o banco de dados sozinho.
Exibir registros de proxy do Zabbix
localhost:~> sudo tail -f /var/log/zabbix/zabbix_proxy.log`
11134:20250519:152232.419 Starting Zabbix Proxy (active) [Zabbix proxy]. Zabbix 7.4.0beta2 (revision 7cd11a01d42).
11134:20250519:152232.419 **** Enabled features ****
11134:20250519:152232.419 SNMP monitoring:       YES
11134:20250519:152232.419 IPMI monitoring:       YES
11134:20250519:152232.419 Web monitoring:        YES
11134:20250519:152232.419 VMware monitoring:     YES
11134:20250519:152232.419 ODBC:                  YES
11134:20250519:152232.419 SSH support:           YES
11134:20250519:152232.419 IPv6 support:          YES
11134:20250519:152232.419 TLS support:           YES
11134:20250519:152232.419 **************************
11134:20250519:152232.419 using configuration file: /etc/zabbix/zabbix_proxy.conf
11134:20250519:152232.419 cannot open database file "/var/lib/zabbix/zabbix_proxy.db": [2] No such file or directory
11134:20250519:152232.419 creating database ...
11134:20250519:152232.478 current database version (mandatory/optional): 07030032/07030032
11134:20250519:152232.478 required mandatory version: 07030032
No caso do proxy ativo, agora estamos prontos. Voltando ao frontend, poderemos ver que nosso proxy está on-line. O Zabbix também mostrará a versão do nosso proxy e a última idade vista.
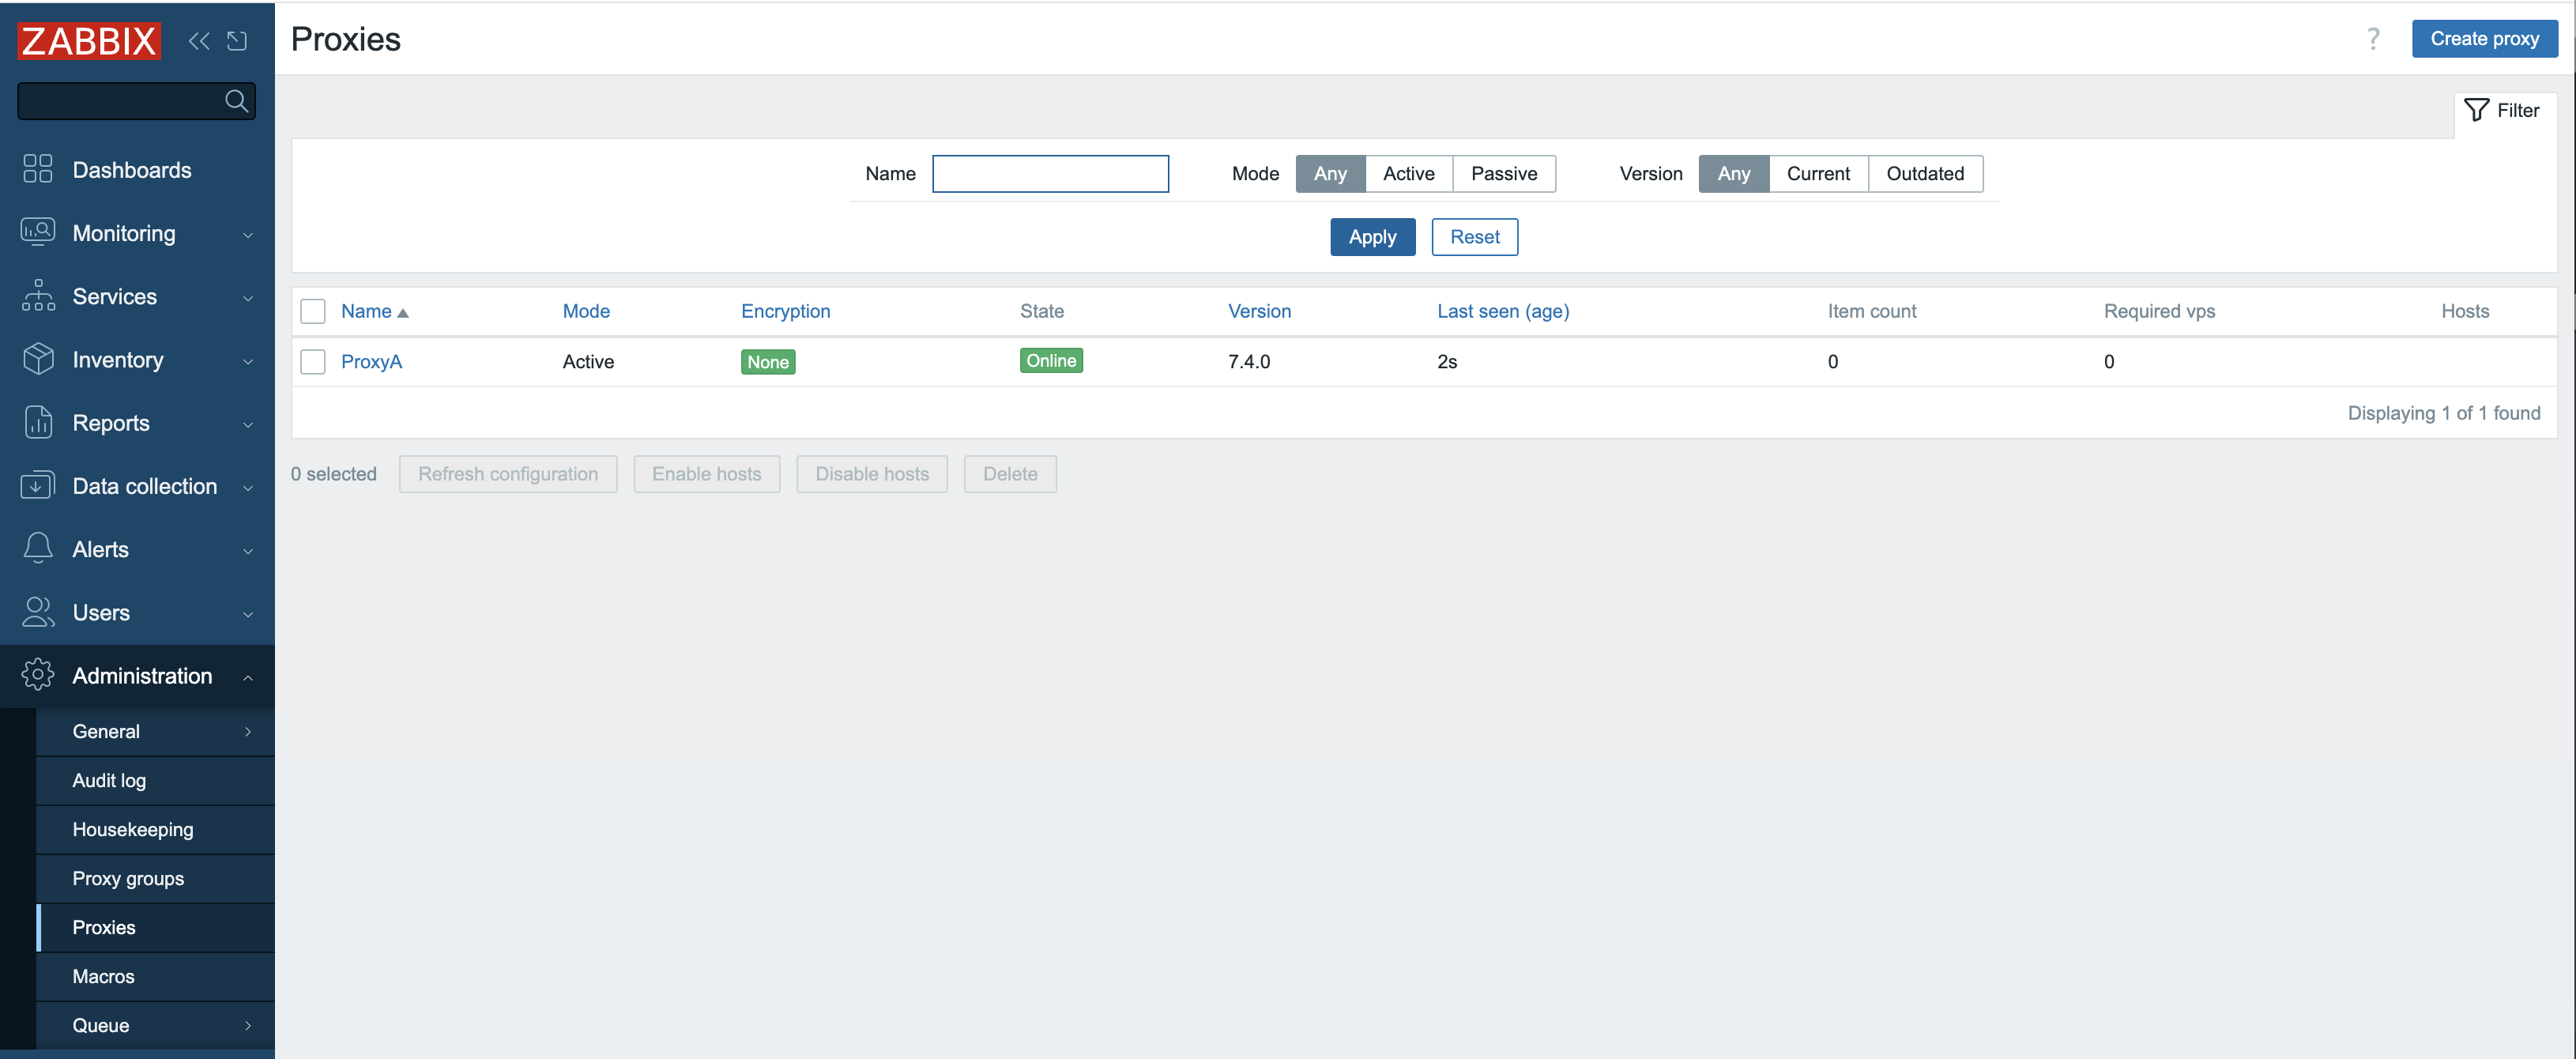
3.6 Proxy ativo configurado
No caso do proxy passivo, no entanto, você notará no frontend que nada parece estar funcionando, mesmo quando configuramos tudo corretamente em nosso proxy.
3.7 O proxy não está funcionando
A explicação é bastante simples, pois executamos um proxy passivo e o servidor Zabbix precisa pesquisar nosso proxy. Mas ainda não configuramos nosso servidor para fazer isso no momento. Portanto, a próxima etapa é adicionar os pollers de proxy necessários na configuração do nosso servidor.
Edite ou crie um novo arquivo de configuração em /etc/zabbix/zabbix_server.d/
na máquina Zabbix Server para adicionar a configuração necessária
StartProxyPollers.
E reinicie o processo Zabbix Server.
Agora, voltando ao frontend, veremos que o nosso proxy passivo está disponível. Se ele não estiver verde, aguarde alguns segundos ou verifique todas as etapas novamente e verifique seus arquivos de registro.

3.8 Funcionamento do proxy
Agora você está pronto.
Para seus hosts monitorados, esse proxy se comportará como o servidor Zabbix.
Portanto, todos os hosts que você deseja que sejam monitorados pelo proxy terão
de ser configurados para que os valores de configuração Server e/ou
ServerActive sejam definidos como o IP/nome do host desse proxy em vez do
Zabbix Server.
Conclusão
Este capítulo demonstrou o papel indispensável dos proxies do Zabbix na criação de infraestruturas de monitoramento robustas, dimensionáveis e distribuídas. Exploramos a distinção fundamental entre os modos de proxy active e passive, destacando como cada um deles atende a diferentes cenários de implementação e topologias de rede. Compreender seus pontos fortes individuais, desde configurações simplificadas de firewall com proxies ativos até o controle iniciado pelo servidor de proxies passivos , é essencial para o projeto ideal do sistema.
Nós nos aprofundamos nas configurações abrangentes que regem o comportamento do proxy, enfatizando como a configuração adequada de parâmetros, como intervalos de sondagem do proxy e buffers de dados, afeta diretamente o desempenho e a precisão dos dados. A evolução dos mecanismos de armazenamento de dados no proxy, desde abordagens puramente baseadas em memória até as opções flexíveis de armazenamento em disco e híbrido, permite que os administradores ajustem com precisão a utilização de recursos e a persistência de dados com base em suas necessidades específicas e no volume de dados monitorados.
Por fim, examinamos os avanços críticos na sincronização de configurações, particularmente as melhorias significativas introduzidas com o Zabbix 7.0. A mudança em direção a processos de sincronização de configuração mais eficientes e simplificados, indo além das limitações das versões anteriores, ressalta o compromisso contínuo da Zabbix em aumentar a eficiência operacional e simplificar as implementações em larga escala.
Em essência, os proxies do Zabbix são muito mais do que simples encaminhadores de dados; eles são intermediários inteligentes que descarregam um processamento significativo do servidor central do Zabbix, reduzem o tráfego de rede e aumentam a resiliência de sua solução de monitoramento. Selecionando cuidadosamente o tipo de proxy apropriado, configurando meticulosamente suas definições e aproveitando os recursos mais recentes de armazenamento de dados e gerenciamento de configuração, você pode liberar todo o potencial do Zabbix para monitorar até mesmo os ambientes mais complexos e geograficamente dispersos com eficiência e confiabilidade incomparáveis. O conhecimento adquirido neste capítulo será fundamental para projetar e manter uma infraestrutura do Zabbix que não seja apenas robusta hoje, mas também adaptável a futuros desafios de monitoramento.
Perguntas
- Qual é a diferença fundamental entre um proxy ativo e um proxy passivo em termos de quem inicia a conexão?
- Qual é a diferença entre a configuração de um firewall de rede para proxies ativos e passivos quando separados do servidor por um firewall de rede?