Configuration HA
Dans cette section, nous allons configurer Zabbix dans une configuration de haute disponibilité (HA). Cette fonctionnalité native, introduite dans Zabbix 6, est une amélioration cruciale qui garantit une surveillance continue même si un serveur Zabbix tombe en panne. Avec HA, lorsqu'un serveur Zabbix tombe en panne, un autre peut prendre le relais de manière transparente.
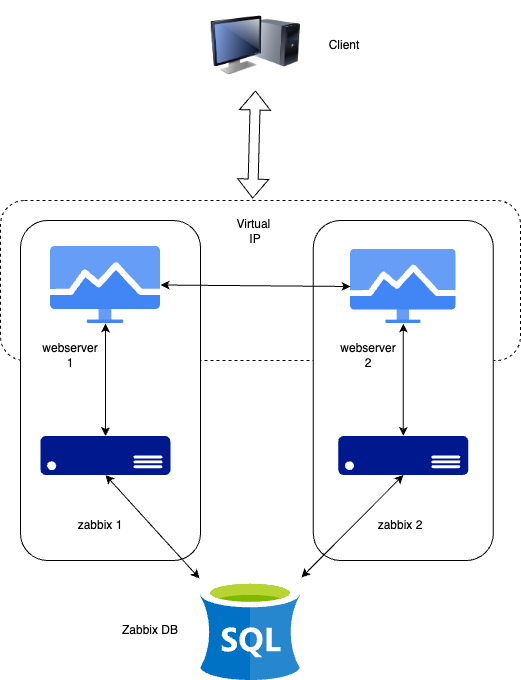
Pour ce guide, nous utiliserons deux serveurs Zabbix et une base de données, mais la configuration permet d'ajouter d'autres serveurs Zabbix si nécessaire.
1.1 Configuration HA
Il est important de noter que la configuration de Zabbix HA est simple, fournissant une redondance sans fonctionnalités complexes telles que l'équilibrage de charge. Un seul nœud sera actif, tous les autres nœuds seront en attente. Tous les serveurs Zabbix en attente dans le cluster HA surveilleront le nœud actif par des battements de cœur en utilisant la base de données partagée. Il n'est pas nécessaire d'ajouter un logiciel de clustering ou même des ports de pare-feu pour le serveur Zabbix lui-même. Cependant, pour le frontend, nous utiliserons Keepalived pour fournir une IP virtuelle (VIP) à des fins de basculement.
Au même titre que dans notre configuration de base, nous allons documenter les détails clés des serveurs dans cette configuration HA. Vous trouverez ci-dessous la liste des serveurs et l'endroit où ajouter leurs adresses IP respectives pour plus de commodité :
| Serveur | Adresse IP |
|---|---|
| Serveur Zabbix 1 | |
| Serveur Zabbix 2 | |
| Base de données | |
| IP virtuelle |
Note
Our database (DB) in this setup is not configured for HA. Since it's not a Zabbix component, you will need to implement your own solution for database HA, such as a HA SAN or a database cluster setup. A DB cluster configuration is out of the scope of this guide and unrelated to Zabbix, so it will not be covered here.
Installer la base de données
Refer to the Zabbix components: Database chapter for detailed instructions on setting up the database. That chapter provides step-by-step guidance on installing either a PostgreSQL or MariaDB database on a dedicated node running Ubuntu, SUSE or Rocky Linux. The same installation steps apply when configuring the database for this setup.
Installation du cluster Zabbix
La mise en place d'un cluster Zabbix consiste à configurer plusieurs serveurs Zabbix pour qu'ils fonctionnent ensemble et offrent une haute disponibilité. Bien que le processus soit similaire à la configuration d'un seul serveur Zabbix, des étapes de configuration supplémentaires sont nécessaires pour activer la haute disponibilité (HA).
Start by preparing the systems for- and installing Zabbix server on all systems by following the steps in the Preparing the server for Zabbix and Installing Zabbix server sections of the Zabbix components chapter.
Do note that:
- you need to skip the database population step on all but the first Zabbix server as the database is shared between all Zabbix servers.
- you need to skip the enabling and starting of the zabbix-server service on all servers as we will start it later after the HA configuration is done.
- you make sure that all Zabbix servers can connect to the database server. For
example, if you are using PostgreSQL, ensure that the
pg_hba.conffile is configured to allow connections from all Zabbix servers. - all Zabbix servers should use the same database name, user, and password to connect to the database.
- all Zabbix servers should be of the same major version.
When all Zabbix servers are installed and configured to access the database, we can proceed with the HA configuration.
Configuration du serveur Zabbix 1
Add a new configuration file for the HA setup on the first Zabbix server:
Add High Availability Zabbix server configuration
Insert the following line into the configuration file to enable HA mode.
Specify the frontend node address for failover scenarios:
Warning
The NodeAddress must match the IP or FQDN name of the Zabbix server node.
Without this parameter the Zabbix front-end is unable to connect to the active
node. The result will be that the frontend is unable to display the status
the queue and other information.
Configuration de Zabbix Server 2
Répétez les étapes de configuration pour le deuxième serveur Zabbix. Ajustez les
champs HANodeName et NodeAddress si nécessaire pour ce serveur.
Zabbix server 2 HA configuration high-availability.conf
You can add more servers by repeating the same steps, ensuring each server has a
unique HANodeName and the correct NodeAddress set.
Démarrage du serveur Zabbix
Après avoir configuré les deux serveurs, activez et démarrez le service zabbix-server sur chacun d'eux :
Vérification de la configuration
Vérifiez les fichiers journaux des deux serveurs pour vous assurer qu'ils ont démarré correctement et qu'ils fonctionnent dans leurs modes HA respectifs.
Sur le premier serveur :
Dans les journaux du système, vous devriez observer les entrées suivantes, indiquant l'initialisation du gestionnaire de haute disponibilité (HA) :
HA log messages on active node
These log messages confirm that the HA manager process has started and has assumed the active role. This means that the Zabbix instance is now the primary node in the HA cluster, handling all monitoring operations. If a failover event occurs, another standby node will take over based on the configured HA strategy.
Running the same command on the second server (and any additional nodes):
HA log messages on standby node
Ces messages confirment que le processus du gestionnaire HA a été lancé avec succès en mode veille. Cela suggère que le nœud est opérationnel mais qu'il n'agit pas actuellement en tant qu'instance HA active, en attendant d'autres transitions d'état basées sur la stratégie HA configurée.
À ce stade, votre cluster Zabbix est configuré correctement pour la haute disponibilité (HA). Les journaux du système confirment que le gestionnaire HA a été initialisé et qu'il fonctionne en mode veille, ce qui indique que les mécanismes de basculement sont en place. Cette configuration garantit une surveillance ininterrompue, même en cas de défaillance d'un serveur, en permettant des transitions de rôle automatiques basées sur la configuration HA.
Installation du frontend
Before proceeding with the installation and configuration of the web server, it is essential to install some sort of clustering software or use a load-balancer in front of the Zabbix frontends to be able to have a shared Virtual IP (VIP).
load-balancers, including Pacemaker, Corosync, HAProxy, F5 Big-Ip, Citrix NetScaler, and various cloud load balancers. Each of these solutions offers a range of features and capabilities beyond just providing a VIP for failover purposes. But for the purpose of this guide, we will focus on a minimalistic approach to achieve high availability for the Zabbix frontend using Keepalived.
Keepalived is like a helper that makes sure one computer takes over if another one stops working. It gives them a shared magic IP address so users don't notice when a server fails. If the main one breaks, the backup jumps in right away by taking over the IP.
Keepalived is a minimal type of clustering software that enables the use of a (VIP) for frontend services, ensuring seamless failover and service continuity.
High Availability on SUSE Linux Enterprise Server (SLES)
On SUSE Linux Enterprise Server (SLES), Keepalived is not included in the default subscription hence unavailable in the default repositories.
To be able to install and use Keepalived on SLES in a supported way, you will need to obtain the additional 'SUSE Linux Enterprise High Availability Extension' subscription (SLE HA). This subscription provides access to the necessary packages and updates required for Keepalived and other high availability components. After obtaining the subscription, you can enable the appropriate repositories and proceed with the installation of Keepalived as outlined in this guide:
WhereADDITIONAL_REGCODE is the registration code provided with your
'SUSE Linux Enterprise High Availability Extension' subscription.
Mise en place de keepalived
On all Servers that will host the Zabbix fronted we have to install keepalived. As mentioned before, this can be done on separate servers to split up the server and frontend roles, but in this guide we will install keepalived on both Zabbix servers to ensure high availability of both the frontend and the server.
Install keepalived
Red Hat
SUSE
Ubuntu
Next, we need to modify the Keepalived configuration on all servers. While the configurations will be similar, each server requires slight adjustments. We will begin with Server 1. To edit the Keepalived configuration file, use the following command:
If the file contains any existing content, it should be cleared and replaced with the following lines:
Warning
Replace enp0s1 with the interface name of your machine and replace the password
with something secure. For the virtual_ipaddress use a free IP from your network.
This will be used as our VIP.
We can now do the same modification on our second or any subsequent Zabbix
server. Delete again everything in the /etc/keepalived/keepalived.conf file
like we did before and replace it with following lines:
Just as with our 1st Zabbix server, replace enp0s1 with the interface name of
your machine and replace the password with your password and fill in the
virtual_ipaddress as done before.
Make sure that the firewall allows Keepalived traffic on all servers. The VRRP
protocol is different than the standard IP protocol and uses multicast address
224.0.0.18. Therefore, we need to explicitly allow this traffic through the
firewall. Perform the following commands on all servers:
Allow keepalived traffic through the firewall
Red Hat / SUSE
Ubuntu
This ends the configuration of Keepalived. We can now continue adapting the frontend.
Installer et configurer le frontend
Install the Zabbix frontend on all Zabbix servers, part of the cluster by following the steps outlined in the Installing the frontend section.
Warning
Ubuntu users need to use the VIP in the setup of Nginx, together with the local IP in the listen directive of the config.
Note
Don't forget to configure both front-ends. Also this is a new setup. Keep in
mind that with an existing setup we need to comment out the lines $ZBX_SERVER
and $ZBX_SERVER_PORT in /etc/zabbix/web/zabbix.conf.php. Our frontend
will check what node is active by reading the node table in the database.
You can verify which node is active by querying the ha_node table in the
Zabbix database. This table contains information about all nodes in the HA
cluster, including their status. To check the status of the nodes, you can run
the following SQL query:
Check the ha_node table in a PostgreSQL database
zabbix=> select * from ha_node;
         ha_nodeid         |  name   |   address       | port  | lastaccess | status |       ha_sessionid
---------------------------+---------+-----------------+-------+------------+--------+---------------------------
 cm8agwr2b0001h6kzzsv19ng6 | zabbix1 | xxx.xxx.xxx.xxx | 10051 | 1742133911 |      0 | cm8apvb0c0000jkkzx1ojuhst
 cm8agyv830001ell0m2nq5o6n | zabbix2 | localhost       | 10051 | 1742133911 |      3 | cm8ap7b8u0000jil0845p0w51
(2 rows)
Dans ce cas, le nœud zabbix2 est identifié comme le nœud actif, comme
l'indique sa valeur d'état 3, qui désigne un état actif. Les valeurs d'état
possibles sont les suivantes :
0- Plusieurs nœuds peuvent rester en mode veille.1- Un nœud précédemment détecté a été arrêté.2- Un nœud a été détecté précédemment mais est devenu indisponible sans avoir été correctement arrêté.3- Le nœud est actuellement actif.
Cette classification permet une surveillance et une gestion efficace de l'état au sein du cluster.
Once the frontend is installed on all servers, we need to start and enable the Keepalived service to ensure it starts automatically on boot and begins managing the VIP:
Vérifier le bon fonctionnement
To verify that the setup is functioning correctly, access your Zabbix server using the Virtual IP (VIP). Navigate to Reports → System Information in the menu. At the bottom of the page, you should see a list of servers, with at least one marked as active. The number of servers displayed will depend on the total configured in your HA setup.

1.2 vérifier l'HA
Shut down or reboot the active frontend server and observe that the Zabbix frontend remains accessible. Upon reloading the page, you will notice that the other frontend server has taken over as the active instance, ensuring an almost seamless failover and high availability.

1.3 vérifier l'HA
Outre la surveillance de l'état des nœuds HA, Zabbix fournit plusieurs commandes d'exécution qui permettent aux administrateurs de gérer les paramètres de basculement et de supprimer les nœuds inactifs de manière dynamique.
L'une de ces commandes est la suivante :
Cette commande ajuste le délai de basculement, qui définit la durée pendant laquelle Zabbix attend avant de faire passer un nœud en attente à l'état actif. Le délai peut être défini entre 10 secondes et 15 minutes.
Pour supprimer un nœud qui est soit arrêté ou inaccessible, la commande suivante doit être utilisée :
L'exécution de cette commande supprime le nœud du cluster HA. Si la suppression est réussie, la sortie confirme l'action :
Removal of a node
Si le nœud supprimé redevient disponible, il peut être ajouté automatiquement
lorsqu'il se reconnecte au cluster. Ces commandes offrent une certaine souplesse
pour gérer la haute disponibilité dans Zabbix sans nécessiter un redémarrage
complet du processus zabbix_server.
Conclusion
Dans ce chapitre, nous avons réussi à mettre en place un environnement Zabbix à haute disponibilité (HA) en configurant le serveur Zabbix et le frontend pour la redondance. Nous avons d'abord établi la haute disponibilité pour le serveur Zabbix, en veillant à ce que les services de surveillance restent disponibles même en cas de défaillance. Ensuite, nous nous sommes concentrés sur le frontend, en implémentant une IP virtuelle (VIP) avec Keepalived pour fournir un basculement transparent et une accessibilité continue.
En outre, nous avons configuré le pare-feu pour autoriser le trafic Keepalived et nous nous sommes assurés que le service démarre automatiquement après un redémarrage. Avec cette configuration, le frontend Zabbix peut basculer dynamiquement d'un serveur à l'autre, minimisant ainsi les temps d'arrêt et améliorant la fiabilité.
Bien que l'HA des bases de données soit une considération importante, elle n'entre pas dans le cadre de cette configuration. Cependant, cette base fournit un point de départ solide pour construire une infrastructure de surveillance résiliente qui peut être améliorée selon les besoins.
Questions
- Qu'est-ce que la Haute Disponibilité (HA) de Zabbix, et pourquoi est-elle importante ?
- How does Zabbix determine which node is active in an HA setup?
- Can multiple Zabbix nodes be active simultaneously in an HA cluster? Why or why not?
- What configuration file(s) are required to enable HA in Zabbix?