Disk Health Monitoring on Windows with Smartmontools
This guide explains how to enable monitoring of the disk “health” (temperature, errors, wear level, alerts) on Windows computers using Zabbix + Smartmontools.
Install Zabbix Agent 2 (required)
To use Smartmontools with Zabbix, you must install Zabbix Agent 2. The standard Zabbix Agent does not support this functionality
https://cdn.zabbix.com/zabbix/binaries/stable/8.0/latest/
During installation:
- Enter the Raspberry Pi IP address (your Zabbix Proxy) in both fields that request the server IP.
- Complete the installation normally.
 15.1_agent_config
Set the Agent service to automatic start
In Windows:
- Open Services
- Find Zabbix Agent 2
- Right-click → Properties
- Set Startup type to Automatic
- Click Start if the service is not already running This ensures
monitoring continues after PC restarts
 15.2 Configure Services
Test Smartmontools
Download the smartmontools latest version. Ex: smartmontools-7.5.win32-setup.exe
https://github.com/smartmontools/smartmontools/releases/
After installing Smartmontools, open Command Prompt (CMD) and run:
smartctl.exe -a /dev/sdX (where sdX is the name of your diskdrive)
If everything is correct, it will display detailed information about your SSD/HDD such as temperature, usage hours, alerts, and more.
 15.3 Smartmontools
Configure the Smart plugin in Zabbix Agent 2
Locate the plugin configuration folder:
- C:\Program Files\Zabbix Agent 2\zabbix_agent2.d\plugins.d
- Open the file smart.conf using Notepad as Administrator, then add the following line:
- Plugins.Smart.Path=C:\PROGRA~1\smartmontools\bin\smartctl.exe Save and close the file.
 15.4 Plugins
 15.5 plugin config
Test communication between Zabbix Agent 2 and Smartmontools
Inside the Zabbix Agent 2 installation folder, run: zabbix_agent2.exe -t smart.disk.get If successful, it will return the disk information that will be sent to Zabbix.
 15.6 communication check
Configure it in the Zabbix Web Interface
In Zabbix do the following steps:
- Open the Host you want to monitor (Data collection -> Hosts)
- Go to Templates
- Add the following template:
 15.7 Host add
Wait 1–5 minutes for Zabbix to automatically detect the disk sensors and metrics. If it does not detect anything:
- Restart the Zabbix Agent 2 service in Windows
- Execute the discovery rule
- Wait a few more minutes
After collecting all the data, Zabbix will display all relevant disk health data, such as:
- Temperature
- SMART errors
- Wear level
- Critical alerts
- Read/Write status
- Estimated disk lifespan
Let's have a look at our latest data page. Monitoring -> Latest data.
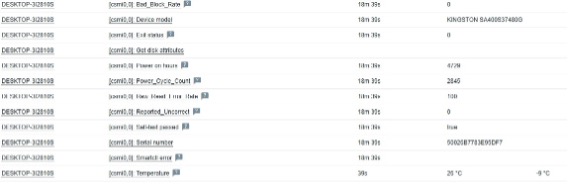
15.8 latest data