Basic installation
In this chapter, we will walk through the process of installing the Zabbix server. There are many different ways to setup a Zabbix server. We will cover the most common setups with MariaDB and PostgreSQL on RHEL- and SLES-based distro's and Ubuntu.
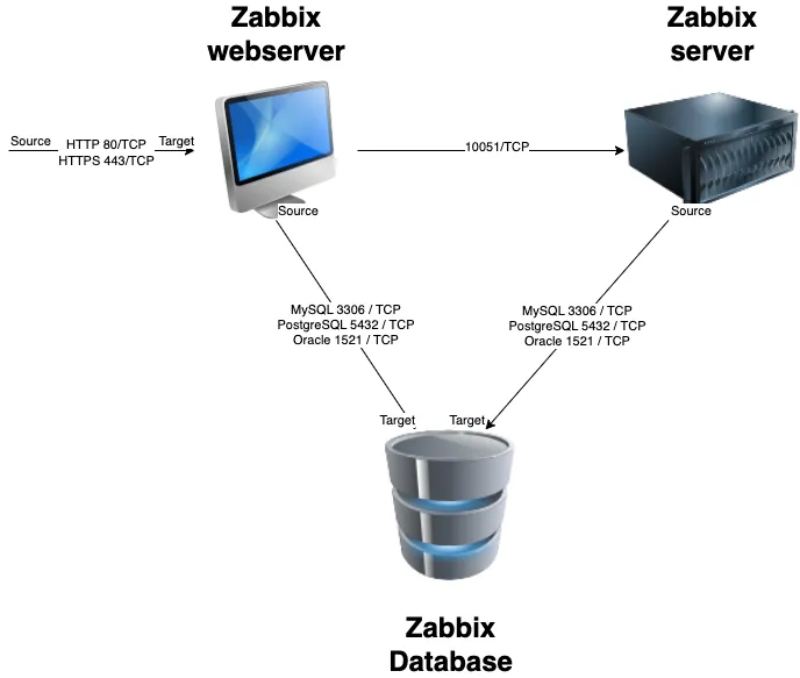
Before beginning the installation, it is important to understand the architecture of Zabbix. The Zabbix server is structured in a modular fashion, composed of three main components, which we will discuss in detail.
- The Zabbix server
- The Zabbix web server
- The Zabbix database
Creation of DB users
In our setup we will create 2 DB users zabbix-web and zabbix-srv. The
zabbix-web user will be used for the frontend to connect to our zabbix database.
The zabbix-srv user will be used by our zabbix server to connect to the database.
This allows us to limit the permissions for every user to only what is strictly
needed.
1.1 Zabbix basic split installation
All of these components can either be installed on a single server or distributed across three separate servers. The core of the system is the Zabbix server, often referred to as the "brain." This component is responsible for processing trigger calculations and sending alerts. The database serves as the storage for the Zabbix server's configuration and all the data it collects. The web server provides the user interface (front-end) for interacting with the system. It is important to note that the Zabbix API is part of the front-end component, not the Zabbix server itself.
These components must function together seamlessly, as illustrated in the diagram above. The Zabbix server must read configurations and store monitoring data in the database, while the front-end needs access to read and write configuration data. Furthermore, the front-end must be able to check the status of the Zabbix server and retrieve additional necessary information to ensure smooth operation.
For our setup, we will be using two virtual machines (VMs): one VM will host both the Zabbix server and the Zabbix web front-end, while the second VM will host the Zabbix database.
Note
It is perfectly possible to install all components on one single VM or every component on a separate VM. The reason why we split the DB in our example is because the database will probably be the first component giving you performance headaches. It is also the component that needs some extra attention when we split it from the other components, so for this reason we have chosen in this example to split the database from the rest of the setup.
We will cover the following topics:
- Install our Database based on MariaDB.
- Install our Database based on PostgreSQL.
- Installing the Zabbix server.
- Install the frontend.
Installing the Zabbix database
Choosing a Database Backend for Zabbix
A critical decision when managing Zabbix installations is selecting the database backend. Zabbix supports several database options: MySQL/Percona, MariaDB, PostgreSQL (including TimescaleDB), and Oracle (up to Zabbix 7.0).
Oracle Database deprecation
Zabbix 7.0 marks the final release to offer support for Oracle Database. Consequently, systems running Zabbix 7.0 or any prior version must undertake a database migration to either PostgreSQL, MySQL, or a compatible fork such as MariaDB before upgrading to a later Zabbix release. This migration is a mandatory step to ensure continued functionality and compatibility with future Zabbix versions.
All supported databases perform similarly under typical Zabbix workloads, and Zabbix treats them equally in terms of functionality. As such, the choice primarily depends on your or your team’s familiarity with a particular database system. One notable exception is TimescaleDB, a PostgreSQL extension optimized for time-series data. This makes it especially well-suited for monitoring applications like Zabbix, which handle large volumes of timestamped data.
In large-scale environments with high-frequency data collection, TimescaleDB can deliver significant performance benefits, including improved query speeds and built-in compression to reduce storage requirements. However, these advantages come with added complexity during installation and a few restrictions on historical data retention.
TimescaleDB installation
Given its advanced nature, TimescaleDB is not essential for most Zabbix users. As such, its installation is beyond the scope of this chapter. If you plan to use TimescaleDB, refer to Partitioning PostgreSQL with TimescaleDB for detailed guidance after installing PostgreSQL.
Choosing the Source for Database Installation
In this chapter we will focus on installing MariaDB and PostgreSQL, as they are the most commonly used databases with Zabbix. For MySQL or Percona installations, except for the package installation commands, the steps are very similar to MariaDB.
When installing MariaDB or PostgreSQL you must determine the source from which you will want to install the database server. Two primary options are available:
- Vendor-Provided Packages
-
These are included in the software repositories of most Linux distributions and are maintained by the distribution vendor.
Advantages:
- Simplified installation: Packages are readily available via the distribution’s package manager.
- Vendor support: For enterprise distributions (e.g., RHEL, SLES), active subscriptions include official support.
- Compatibility: Guaranteed integration with other system packages and dependencies.
- Distribution-specific optimizations: Includes tailored configurations (e.g., logrotate, bash completion,...).
- Long-term maintenance: Security and bug fixes are backported by the vendor for the duration of the distribution’s support lifecycle.
Disadvantages:
- Version lock-in: Major distribution upgrades may automatically introduce newer database versions, potentially requiring compatibility checks with Zabbix.
- Vendor modifications: Default configurations, log directories, and data paths may be altered to align with distribution-specific standards.
- Official MariaDB/PostgreSQL Repositories
-
These repositories provide packages directly from MariaDB/PostgreSQL and offer access to the latest stable releases.
Advantages:
- Up-to-date versions: Immediate access to the latest features, security patches, and bug fixes. However, make sure Zabbix is compatible with the chosen version.
- Enterprise support: Option to purchase MariaDB Enterprise or Enterprise DB respectively, which includes professional support and additional features.
Disadvantages:
- Manual version management: Users must proactively monitor and upgrade to new major versions to ensure continued security and bug fix coverage.
Database version compatibility
Whether you plan to use the OS vendor-provided packages or the official database-vendor packages, ensure that the database version is supported by your Zabbix version to avoid potential integration issues. Check the Zabbix documentation for the latest supported versions.
Before installing the database software, ensure that the server(s) meet the configuration requirements outlined in the previous section: System Requirements.
Installing the MariaDB Database
In this section we will install the MariaDB server and -client packages. This will provide the necessary components to run and manage MariaDB as your Zabbix database backend.
If you prefer to use PostgreSQL as your database backend, you can skip this section and proceed to the Installing the PostgreSQL Database section.
???+ tip "MySQL/Percona" If you prefer to use MySQL or Percona instead of
MariaDB, the installation and configuration steps are very similar. Generally,
you would replace mariadb with mysql in the package names and commands.
Installing MariaDB Server and Client from OS Vendor-Provided Packages
To install the distribution default MariaDB server and client, execute the following command:
Install distribution version of Mariadb
Red Hat
SUSE
Ubuntu
This command will download and install both the server and client packages, enabling you to set up, configure, and interact with your MariaDB database. Once the installation is complete, you can proceed to the Starting the MariaDB database section.
Installing MariaDB Server and Client from Official MariaDB Repositories
If you prefer to install MariaDB from the official MariaDB repositories instead of the OS vendor-provided packages, the first step is to add the MariaDB repository to your system.
Adding the MariaDB Repository
To create the MariaDB repository file, execute the following command in your terminal:
Define the MariaDB repository
Red Hat
SUSE
Ubuntu
This will open a text editor where you can input the repository configuration details. Once the repository is configured, you can proceed with the installation of MariaDB using your package manager.
The latest config can be found here: https://mariadb.org/download/?t=repo-config
Here's an example configuration for MariaDB 11.4 repositories:
Mariadb repository configuration
Red Hat
# MariaDB 11.4 RedHatEnterpriseLinux repository list - created 2025-02-21 10:15 UTC
# https://mariadb.org/download/
[mariadb]
name = MariaDB
# rpm.mariadb.org is a dynamic mirror if your preferred mirror goes offline. See https://mariadb.org/mirrorbits/ for details.
# baseurl = https://rpm.mariadb.org/11.4/rhel/$releasever/$basearch
baseurl = https://mirror.bouwhuis.network/mariadb/yum/11.4/rhel/$releasever/$basearch
# gpgkey = https://rpm.mariadb.org/RPM-GPG-KEY-MariaDB
gpgkey = https://mirror.bouwhuis.network/mariadb/yum/RPM-GPG-KEY-MariaDB
gpgcheck = 1
SUSE
# MariaDB 11.4 openSUSE repository list - created 2025-12-29 14:34 UTC
# https://mariadb.org/download/
[mariadb]
name = MariaDB
# rpm.mariadb.org is a dynamic mirror if your preferred mirror goes offline. See https://mariadb.org/mirrorbits/ for details.
# baseurl = https://rpm.mariadb.org/11.4/opensuse/$releasever/$basearch
# baseurl = https://rpm.mariadb.org/11.4/opensuse/$releasever/$basearch
baseurl = https://mirror.bouwhuis.network/mariadb/yum/11.4/opensuse/$releasever/$basearch
# gpgkey = https://rpm.mariadb.org/RPM-GPG-KEY-MariaDB
gpgkey = https://mirror.bouwhuis.network/mariadb/yum/RPM-GPG-KEY-MariaDB
gpgcheck = 1
Ubuntu
# MariaDB 11.4 repository list - created 2025-02-21 11:42 UTC
# https://mariadb.org/download/
X-Repolib-Name: MariaDB
Types: deb
# deb.mariadb.org is a dynamic mirror if your preferred mirror goes offline. See https://mariadb.org/mirrorbits/ for details.
# URIs: https://deb.mariadb.org/11.4/ubuntu
URIs: https://mirror.bouwhuis.network/mariadb/repo/11.4/ubuntu
Suites: noble
Components: main main/debug
Signed-By: /etc/apt/keyrings/mariadb-keyring.pgp
After saving the file, ensure that everything is properly set up and that your preferred MariaDB version is compatible with your Zabbix version to avoid potential integration issues.
Installing MariaDB Server and Client
With the MariaDB repository configured, you are now ready to install the MariaDB server and client packages. This will provide the necessary components to run and manage your database.
To install the MariaDB server and client, execute the following command:
Install MariaDB from official repository
Red Hat
SUSE
sudo rpm --import https://mirror.bouwhuis.network/mariadb/yum/RPM-GPG-KEY-MariaDB
sudo zypper install MariaDB-server MariaDB-client
Ubuntu
This command will download and install both the server and client packages, enabling you to set up, configure, and interact with your MariaDB database. Once the installation is complete, you can proceed to the Starting the MariaDB database section.
Starting the MariaDB Database
Now that MariaDB is installed, we need to enable the service to start automatically upon boot and start it immediately. Use the following command to accomplish this:
This command will both enable and start the MariaDB service and since this will be the first time the service is started, it will initialize the database directory. With the MariaDB service now up and running, you can verify that the installation was successful by checking the version of MariaDB using the following command:
The expected output should resemble this:
MariaDB version example
To ensure that the MariaDB service is running properly, you can check its status with the following command:
You should see an output similar to this, indicating that the MariaDB service is active and running:
Mariadb service status example
localhost:~ $ sudo systemctl status mariadb
● mariadb.service - MariaDB database server
     Loaded: loaded (/usr/lib/systemd/system/mariadb.service; enabled; preset: disabled)
     Active: active (running) since Wed 2025-12-03 00:16:04 CET; 5s ago
       Docs: man:mysqld(8)
             https://mariadb.com/kb/en/library/systemd/
    Process: 11148 ExecStartPre=/usr/lib/mysql/mysql-systemd-helper install (code=exited, status=0/SUCCESS)
    Process: 11155 ExecStartPre=/usr/lib/mysql/mysql-systemd-helper upgrade (code=exited, status=0/SUCCESS)
   Main PID: 11162 (mysqld)
     Status: "Taking your SQL requests now..."
      Tasks: 18 (limit: 4670)
        CPU: 340ms
     CGroup: /system.slice/mariadb.service
             └─11162 /usr/sbin/mysqld --defaults-file=/etc/my.cnf --user=mysql --socket=/run/mysql/mysql.sock

Dec 03 00:16:04 localhost.localdomain systemd[1]: [Note] Plugin 'FEEDBACK' is disabled.
Dec 03 00:16:04 localhost.localdomain systemd[1]: [Note] InnoDB: Loading buffer pool(s) from /var/lib/mysql/ib_buffer_pool
Dec 03 00:16:04 localhost.localdomain systemd[1]: [Note] Server socket created on IP: '127.0.0.1', port: '3306'.
Dec 03 00:16:04 localhost.localdomain systemd[1]: [Note] /usr/sbin/mysqld: ready for connections.
Dec 03 00:16:04 localhost.localdomain systemd[1]: Version: '10.11.14-MariaDB'  socket: '/run/mysql/mysql.sock'  port: 3306  MariaDB package
Dec 03 00:16:04 localhost.localdomain systemd[1]: [Note] InnoDB: Buffer pool(s) load completed at 251203  0:16:04
Dec 03 00:16:04 localhost.localdomain systemd[1]: Started MariaDB database server.
This confirms that your MariaDB server is up and running, ready for further configuration.
Securing the MariaDB Database
To enhance the security of your MariaDB server, it's essential to remove unnecessary test databases, anonymous users, and set a root password. This can be done using the mariadb-secure-installation script, which provides a step-by-step guide to securing your database.
Run the following command:
The mariadb-secure-installation script will guide you through several key steps:
- Set a root password if one isn't already set.
- Remove anonymous users.
- Disallow remote root logins.
- Remove the test database.
- Reload the privilege tables to ensure the changes take effect.
Once complete, your MariaDB instance will be significantly more secure.
mariadb-secure-installation example output
localhost:~ $ sudo mariadb-secure-installation
NOTE: RUNNING ALL PARTS OF THIS SCRIPT IS RECOMMENDED FOR ALL MariaDB
      SERVERS IN PRODUCTION USE!  PLEASE READ EACH STEP CAREFULLY!

In order to log into MariaDB to secure it, we'll need the current
password for the root user. If you've just installed MariaDB, and
haven't set the root password yet, you should just press enter here.

Enter current password for root (enter for none):
OK, successfully used password, moving on...

Setting the root password or using the unix_socket ensures that nobody
can log into the MariaDB root user without the proper authorisation.

You already have your root account protected, so you can safely answer 'n'.

Switch to unix_socket authentication [Y/n] n
 ... skipping.

You already have your root account protected, so you can safely answer 'n'.

Change the root password? [Y/n] y
New password:
Re-enter new password:
Password updated successfully!
Reloading privilege tables..
 ... Success!


By default, a MariaDB installation has an anonymous user, allowing anyone
to log into MariaDB without having to have a user account created for
them.  This is intended only for testing, and to make the installation
go a bit smoother.  You should remove them before moving into a
production environment.

Remove anonymous users? [Y/n] y
 ... Success!

Normally, root should only be allowed to connect from 'localhost'.  This
ensures that someone cannot guess at the root password from the network.

Disallow root login remotely? [Y/n] y
 ... Success!

By default, MariaDB comes with a database named 'test' that anyone can
access.  This is also intended only for testing, and should be removed
before moving into a production environment.

Remove test database and access to it? [Y/n] y
 - Dropping test database...
 ... Success!
 - Removing privileges on test database...
 ... Success!

Reloading the privilege tables will ensure that all changes made so far
will take effect immediately.

Reload privilege tables now? [Y/n] y
 ... Success!

Cleaning up...

All done!  If you've completed all of the above steps, your MariaDB
installation should now be secure.

Thanks for using MariaDB!
You are now ready to configure the database for Zabbix.
Creating the Zabbix database instance
With MariaDB now set up and secured, we can move on to creating the database for Zabbix. This database will store all the necessary data related to your Zabbix server, including configuration information and monitoring data.
Follow these steps to create the Zabbix database:
Log in to the MariaDB shell as the root user: You'll be prompted to enter the root password that you set during the mariadb-secure-installation process.
Once you're logged into the MariaDB shell, run the following command to create a database for Zabbix:
Create the database
What is utf8mb4
utf8mb4 is a proper implementation of UTF-8 in MySQL/MariaDB, supporting all Unicode characters, including emojis. The older utf8 charset in MySQL/MariaDB only supports up to three bytes per character and is not a true UTF-8 implementation, which is why utf8mb4 is recommended.
This command creates a new database named zabbix with the UTF-8 character set,
which is required for Zabbix.
Create a dedicated user for Zabbix and grant the necessary privileges: Next, you
need to create a user that Zabbix will use to access the database. Replace
<password> with a strong password of your choice.
Create users and grant privileges
MariaDB [(none)]> CREATE USER 'zabbix-web'@'<zabbix frontend ip>' IDENTIFIED BY '<password>';
MariaDB [(none)]> CREATE USER 'zabbix-srv'@'<zabbix server ip>' IDENTIFIED BY '<password>';
MariaDB [(none)]> GRANT ALL PRIVILEGES ON zabbix.* TO 'zabbix-srv'@'<zabbix server ip>';
MariaDB [(none)]> GRANT SELECT, UPDATE, DELETE, INSERT ON zabbix.* TO 'zabbix-web'@'<zabbix server ip>';
MariaDB [(none)]> FLUSH PRIVILEGES;
- Replace
<zabbix server ip>with the actual IP address of your server where the Zabbix server will be installed. - Replace
<zabbix frontend ip>with the actual IP address of your server where the Zabbix frontend will be installed.
If both components are installed on the same server, use the same IP address.
Tip
If your Zabbix server, frontend and database are on the same machine, you can replace
<zabbix server ip> and <zabbix frontend ip> with localhost or 127.0.0.1.
This creates new users zabbix-web and zabbix-srv, grants them access to the
Zabbix database, and ensures that the privileges are applied immediately.
At this point, your Zabbix database is ready, but before it can actually be used by Zabbix, we still need to populate the database with the necessary tables and initial data, but that will be covered in the next section when we install the Zabbix server.
If you intent to install Zabbix server on a different machine than the one hosting the database you will need to open the host firewall to allow incoming connections to the database server. By default, MariaDB listens on port 3306.
Add firewall rules
Red Hat / SUSE
Ubuntu
This concludes our installation of the MariaDB. You can now proceed to Preparing the Zabbix server.
Installing the PostgreSQL database
Alternatively to MariaDB/MySQL, you can choose to use PostgreSQL as the database backend for Zabbix. Similar to MariaDB, PostgreSQL can be installed using either the OS vendor-provided packages or the official PostgreSQL repositories.
If you already have installed MariaDB in the previous section, you can skip this section.
As of writing PostgreSQL 13-17 are supported by Zabbix. Check the Zabbix documentation for an up-to-date list of supported versions for your Zabbix version. Usually it's a good idea to go with the latest version that is supported by Zabbix.
TimescaleDB extension
Zabbix also supports the extension TimescaleDB but due to its advanced nature, we won't cover it in this chapter. Refer to Partitioning PostgreSQL with TimescaleDB for detailed instructions on that topic.
Do note that if you want to use TimescaleDB RPM packages provided by Timescale, you will need to install PostgreSQL from the official PostgreSQL repositories instead of the OS vendor-provided packages. If you choose to install PostgreSQL from the OS vendor-provided packages, you will need to compile and install the TimescaleDB extension from source.
Installing PostgreSQL Server and Client from OS Vendor-Provided Packages
To install the distribution default PostgreSQL server, execute the following commands:
Install the Postgres server
Red Hat
SUSE
Ubuntu
This command will download and install both the server and client packages, enabling you to set up, configure, and interact with your PostgreSQL database.
Database initialization required on Red Hat
Due to policies for Red Hat family distributions, the PostgreSQL service does not initialize an empty database required for PostgreSQL to function. So for Red Hat we need to initialize an empty database before continuing:
Red Hat
On SUSE and Ubuntu the OS provided SystemD service will automatically initialize an empty database on first startup.
Once the installation is complete, you can proceed to the Starting the PostgreSQL Database section.
Installing PostgreSQL from Official PostgreSQL Repositories
If you prefer to install PostgreSQL from the official PostgreSQL repositories instead of the OS vendor-provided packages, the first step is to add the PostgreSQL repository to your system.
Adding the PostgreSQL Repository
Set up the PostgreSQL repository with the following commands:
Check https://www.postgresql.org/download/linux/ for more information.
Add PostgreSQL repo
Red Hat
# Install the repository RPM:
dnf install https://download.postgresql.org/pub/repos/yum/reporpms/EL-9-x86_64/pgdg-redhat-repo-latest.noarch.rpm

# Disable the built-in PostgreSQL module:
dnf -qy module disable postgresql
SUSE
# Import the repository signing key:
rpm --import https://zypp.postgresql.org/keys/PGDG-RPM-GPG-KEY-SLES16

# Install the repository RPM:
zypper install https://download.postgresql.org/pub/repos/zypp/reporpms/SLES-16-x86_64/pgdg-suse-repo-latest.noarch.rpm

# Update the package lists:
zypper refresh
openSUSE Leap
Since the official PostgreSQL packages are specifically built for use on SUSE Linux Enterprise Server (SLES), you will get an error trying to install the repository on openSUSE Leap. We can however safely ignore this problem by choosing to "break the package by ignoring some of its dependencies" as long as you match the SLES version with your openSUSE version:
Problem: 1: nothing provides 'sles-release' needed by the to be installed pgdg-suse-repo-42.0-48PGDG.noarch
 Solution 1: do not install pgdg-suse-repo-42.0-48PGDG.noarch
 Solution 2: break pgdg-suse-repo-42.0-48PGDG.noarch by ignoring some of its dependencies

Choose from above solutions by number or cancel [1/2/c/d/?] (c): 2
Suse Linux Enterprise Server
On SUSE Linux Enterprise Server (SLES), ensure you are subscribed to the "SUSE Package Hub extension" repository to access necessary dependency packages required for the Official PostgreSQL installation. On SLES 15 you will also need the "Desktop Applications Module":
Ubuntu
# Import the repository signing key:
sudo apt install curl ca-certificates
sudo install -d /usr/share/postgresql-common/pgdg
sudo curl -o /usr/share/postgresql-common/pgdg/apt.postgresql.org.asc --fail https://www.postgresql.org/media/keys/ACCC4CF8.asc

# Create the repository configuration file:
sudo sh -c 'echo "deb [signed-by=/usr/share/postgresql-common/pgdg/apt.postgresql.org.asc] https://apt.postgresql.org/pub/repos/apt $(lsb_release -cs)-pgdg main" > /etc/apt/sources.list.d/pgdg.list'

# Update the package lists:
sudo apt update
Installing the PostgreSQL Server and Client
With the PostgreSQL repositories configured, you are now ready to install the PostgreSQL server and client packages. This will provide the necessary components to run and manage your database.
Install PostgreSQL from official repositories
Red Hat
SUSE
Ubuntu
This command will download and install both the server and client packages, enabling you to set up, configure, and interact with your PostgreSQL database.
Next, before we can start the PostgreSQL server we need to initialize a new empty database:
Once the installation is complete, you can proceed to the Starting the PostgreSQL Database section.
Starting the PostgreSQL Database
Now that PostgreSQL is installed, we need to enable the service to start automatically upon boot as well as start it immediately. Use the following command to accomplish this:
Enable and start PostgreSQL service
for OS-provided packages
for official PostgreSQL packages:
This command will both enable and start the PostgreSQL service. With the service now up and running, you can verify that the installation was successful by checking the version of PostgreSQL using the following command:
The expected output should resemble this:
To ensure that the PostgreSQL service is running properly, you can check its status with the following command:
Get PostgreSQL status
for OS-provided packages
for official PostgreSQL packages:
You should see an output similar to this, indicating that the PostgreSQL service is active and running:
PostgreSQL service status example
localhost:~ $ sudo systemctl status postgresql-17
● postgresql-17.service - PostgreSQL 17 database server
    Loaded: loaded (/usr/lib/systemd/system/postgresql-17.service; enabled; preset: disabled)
    Active: active (running) since Mon 2025-12-29 17:24:07 CET; 6s ago
Invocation: 43ba47dfee5b415db223e3452c3cfacc
    Docs: https://www.postgresql.org/docs/17/static/
    Process: 11131 ExecStartPre=/usr/pgsql-17/bin/postgresql-17-check-db-dir ${PGDATA} (code=exited, status=0/SUCCESS)
Main PID: 11137 (postgres)
    Tasks: 7 (limit: 4672)
        CPU: 471ms
    CGroup: /system.slice/postgresql-17.service
            ├─11137 /usr/pgsql-17/bin/postgres -D /var/lib/pgsql/17/data/
            ├─11138 "postgres: logger "
            ├─11139 "postgres: checkpointer "
            ├─11140 "postgres: background writer "
            ├─11142 "postgres: walwriter "
            ├─11143 "postgres: autovacuum launcher "
            └─11144 "postgres: logical replication launcher "

Dec 29 17:24:07 localhost.localdomain systemd[1]: Starting PostgreSQL 17 database server...
Dec 29 17:24:07 localhost.localdomain postgres[11137]: 2025-12-29 17:24:07.650 CET [11137] LOG:  redirecting log output to logging co>
Dec 29 17:24:07 localhost.localdomain postgres[11137]: 2025-12-29 17:24:07.650 CET [11137] HINT:  Future log output will appear in di>
Dec 29 17:24:07 localhost.localdomain systemd[1]: Started PostgreSQL 17 database server.
This confirms that your PostgreSQL server is up and running, ready for further configuration.
Securing the PostgreSQL database
PostgreSQL handles access permissions differently from MySQL and MariaDB.
PostgreSQL relies on a file called pg_hba.conf to manage who can access the
database, from where, and what encryption method is allowed for authentication.
About pg_hba.conf
Client authentication in PostgreSQL is configured through the pg_hba.conf
file, where "HBA" stands for Host-Based Authentication. This file specifies
which users can access the database, from which hosts, and how they are authenticated.
For further details, you can refer to the official PostgreSQL documentation."
https://www.postgresql.org/docs/current/auth-pg-hba-conf.html
Add the following lines, the order here is important.
Edit the pg_hba file
Red Hat / SUSE
# for OS-provided packages
vi /var/lib/pgsql/data/pg_hba.conf

# for official packages
vi /var/lib/pgsql/17/data/pg_hba.conf
Ubuntu
Location of pg_hba file
If you don't find the pg_hba.conf and postgres.conf files in the above
mentioned location you can ask PostgreSQL itself for the location using
this command (provided that PostgreSQL is currently running):
The resulting pg_hba file should look like :
Pg_hba example
# "local" is for Unix domain socket connections only
local    zabbix     zabbix-srv                                 scram-sha-256
local    all        all                                        peer
# IPv4 local connections
host     zabbix         zabbix-srv      <ip from zabbix server/24>     scram-sha-256
host     zabbix         zabbix-web      <ip from zabbix server/24>     scram-sha-256
host     all            all             127.0.0.1/32                   scram-sha-256
# IPv6 local connections:
host    zabbix          zabbix-srv      ::1/128                 scram-sha-256
host    zabbix          zabbix-web      ::1/128                 scram-sha-256
host    all             all             ::1/128                 ident
Ensure to keep the order of the entries
The order of the entries in the pg_hba.conf file is crucial, as PostgreSQL
processes these rules sequentially. Ensure that the specific rules for the
zabbix-srv and zabbix-web users are placed before any broader rules like
the default all user rules that could potentially override them.
After we changed the pg_hba.conf file don't forget to restart postgres
otherwise the settings will not be applied. But before we restart, let us also
edit the file postgresql.conf and allow our database to listen on our network
interface for incoming connections from the Zabbix server. PostgreSQL will by
default only allow connections from a unix socket.
Edit postgresql.conf file
Red Hat / SUSE
# for OS-provided packages
vi /var/lib/pgsql/data/postgresql.conf

# for official packages
vi /var/lib/pgsql/17/data/postgresql.conf
Ubuntu
Locate the following line:
and replace it with:
Note
This will enable PostgreSQL to accept connections from any network interface, not just the local machine. In production it's probably a good idea to limit who can connect to the DB.
After making this change, restart the PostgreSQL service to apply the new settings:
Restart the DB server
for OS-provided packages
for official packages
Tip
If the service fails to restart, review the pg_hba.conf file for any syntax errors,
as incorrect entries here may prevent PostgreSQL from starting.
Creating the Zabbix database instance
With the necessary packages installed, you are now ready to create the Zabbix database and users for both the server and frontend.
The PostgreSQL packages automatically create a default postgres linux-user
during installation which has administrative privileges on the PostgreSQL
instance. To administer the database, you will need to execute commands as the
postgres user.
First, create the Zabbix server database user (also referred to as a "role" in PostgreSQL):
Create server users
Next, create the Zabbix frontend user, which will be used to connect to the database:
Create front-end user
Now with the users created, the next step is to create the Zabbix database.
Execute the following command to create the database zabbix with the owner set
to zabbix-srv and the character encoding set to Unicode as required by
Zabbix:
What is this 'template0'?
In PostgreSQL, template0 is a default database template that serves as a pristine
copy of the database system. When creating a new database using template0,
it ensures that the new database starts with a clean slate, without any
pre-existing objects or configurations that might be present in other templates.
This is particularly useful when you want to create a database with specific
settings or extensions without inheriting any unwanted elements from other templates.
Once the database is created, you should verify the connection and ensure that
the correct user session is active. To do this, log into the zabbix database
using the zabbix-srv user:
After logging in, run the following SQL query to confirm that both the
session_user and current_user are set to zabbix-srv:
If the output matches, you are successfully connected to the database with the correct user.
PostgreSQL differs significantly from MySQL or MariaDB in several aspects, and one of the key features that sets it apart is its use of schemas. Unlike MySQL, where databases are more standalone, PostgreSQL's schema system provides a structured, multi-user environment within a single database.
Schemas act as logical containers within a database, enabling multiple users or applications to access and manage data independently without conflicts. This feature is especially valuable in environments where several users or applications need to interact with the same database server concurrently. Each user or application can have its own schema, preventing accidental interference with each other's data.
Note
PostgreSQL comes with a default schema, typically called public, but in
general, it's a best practice to create custom schemas to better organize and separate
database objects, especially in complex or multi-user environments.
For more in-depth information, I recommend checking out the detailed guide at this URI, https://hevodata.com/learn/postgresql-schema/#schema which explains the benefits and use cases for schemas in PostgreSQL.
To finalize the initial database setup for Zabbix, we need to configure schema
permissions for both the zabbix-srv and zabbix-web users.
First, we create a custom schema named zabbix_server and assign ownership to
the zabbix-srv user:
Next, we set the search path to zabbix_server schema so that it's the
default for the current session:
Tip
If you prefer not to set the search path manually each time you log in as the
zabbix-srv user, you can configure PostgreSQL to automatically use the desired
search path. Run the following SQL command to set the default search path for
the zabbix-srv role:
This command ensures that every time the zabbix-srv user connects to the
database, the search_path is automatically set to zabbix_server.
To confirm the schema setup, you can list the existing schemas:
Verify schema access
At this point, the zabbix-srv user has full access to the schema, but the
zabbix-web user still needs appropriate permissions to connect and interact
with the database. First, we grant USAGE privileges on the schema to allow
zabbix-web to connect:
Grant access to schema for user zabbix-web
Now, the zabbix-web user has appropriate access to interact with the schema
while maintaining security by limiting permissions to essential operations.
If you are ready you can exit the database and return to your linux shell.
At this point, your Zabbix database is ready, but before it can actually be used by Zabbix, we still need to populate the database with the necessary tables and initial data, but that will be covered in the next section when we install the Zabbix server.
If you intent to install Zabbix server on a different machine than the one hosting the database you will need to open the host firewall to allow incoming connections to the database server. By default, PostgreSQL listens on port 5432.
Add firewall rules
Red Hat / SUSE
Ubuntu
This concludes our installation of the PostgreSQL database.
Preparing the server for Zabbix
Before installing the Zabbix server and/or frontend, ensure that the server(s) meet the configuration requirements outlined in the previous section: System Requirements.
If you plan to install the Zabbix server and frontend on separate machines, prepare each server individually according to the instructions provided here.
Disable SELinux on RHEL
Another critical step at this stage if you use Red Hat based systems is disabling SELinux, which can interfere with the installation and operation of Zabbix. We will revisit SELinux at the end of this chapter once our installation is finished.
To check the current status of SELinux, you can use the following command: `sestatus``
Selinux status
~# sestatus
SELinux status:                 enabled
SELinuxfs mount:                /sys/fs/selinux
SELinux root directory:         /etc/selinux
Loaded policy name:             targeted
Current mode:                   enforcing
Mode from config file:          enforcing
Policy MLS status:              enabled
Policy deny_unknown status:     allowed
Memory protection checking:     actual (secure)
Max kernel policy version:      33
As shown, the system is currently in enforcing mode. To temporarily disable
SELinux, you can run the following command: setenforce 0
Disable SeLinux
~# setenforce 0
~# sestatus
SELinux status:                 enabled
SELinuxfs mount:                /sys/fs/selinux
SELinux root directory:         /etc/selinux
Loaded policy name:             targeted
Current mode:                   permissive
Mode from config file:          enforcing
Policy MLS status:              enabled
Policy deny_unknown status:     allowed
Memory protection checking:     actual (secure)
Max kernel policy version:      33
Now, as you can see, the mode is switched to permissive. However, this change is
not persistent across reboots. To make it permanent, you need to modify the
SELinux configuration file located at /etc/selinux/config. Open the file and
replace enforcing with permissive.
Alternatively, you can achieve the same result more easily by running the following command:
Disable SeLinux permanent
Red Hat
This line will alter the configuration file for you. So when we run sestatus
again we will see that we are in permissive mode and that our configuration
file is also in permissive mode.
Verify selinux status again
~# sestatus
SELinux status:                 enabled
SELinuxfs mount:                /sys/fs/selinux
SELinux root directory:         /etc/selinux
Loaded policy name:             targeted
Current mode:                   permissive
Mode from config file:          permissive
Policy MLS status:              enabled
Policy deny_unknown status:     allowed
Memory protection checking:     actual (secure)
Max kernel policy version:      33
Install the Zabbix repository
From the Zabbix Download page https://www.zabbix.com/download, select the appropriate Zabbix version you wish to install. In this case, we will be using Zabbix 8.0 LTS. Additionally, ensure you choose the correct OS distribution for your environment, which will be Rocky Linux 9, openSUSE Leap 16 or Ubuntu 24.04 in our case.
We will be installing the Zabbix Server along with NGINX as the web server for the front-end. Make sure to download the relevant packages for your chosen configuration.

1.2 Zabbix download
Red Hat specific remarks
If you make use of a RHEL based system like Rocky then the first step is to
disable the Zabbix packages provided by the EPEL repository, if it's installed
on your system. To do this, edit the /etc/yum.repos.d/epel.repo file and add
the following statement to disable the EPEL repository by default:
Tip
It's considered bad practice to keep the EPEL repository enabled all the time,
as it may cause conflicts by unintentionally overwriting or installing unwanted
packages. Instead, it's safer to enable the repository only when needed, by using
the following command during installations: dnf install --enablerepo=epel
OpenSUSE specific remarks
On openSUSE, Zabbix packages are also available in the default repo-oss
repository. Unlike RHEL-based systems, openSUSE does not provide a built-in way
to exclude specific packages from individual repositories. However, the Zabbix
packages included in the default repositories are typically one to two LTS
versions behind the latest releases. As a result, they are unlikely to interfere
with your installation unless they are already installed.
In the next step, we will configure the official Zabbix repositories. As long as
you select a Zabbix repository version newer than the packages available in
repo-oss, zypper will automatically install the most recent version.
Tip
If you have already installed Zabbix packages from the default repositories, it is recommended to either:
- Remove them before proceeding, or
- Upgrade them after adding the new Zabbix repositories, using the zypper
option
--allow-vendor-change.
Suse Linux Enterprise Server (SLES)
If you are using SLES, the Zabbix packages are not included in the default repositories. Therefore, you can proceed to add the official Zabbix repository without any concerns about conflicts with existing packages.
Adding the Zabbix repository
Next, we will install the Zabbix repository on our operating system. After adding the Zabbix repository, it is recommended to perform a repository cleanup to remove old cache files and ensure the repository metadata is up to date. You can do this by running:
Add the zabbix repo
Red Hat
rpm -Uvh https://repo.zabbix.com/zabbix/8.0/release/rocky/9/noarch/zabbix-release-latest-8.0.el9.noarch.rpm
dnf clean all
SUSE
rpm -Uvh --nosignature https://repo.zabbix.com/zabbix/8.0/release/sles/16/noarch/zabbix-release-latest-8.0.sles16.noarch.rpm
zypper --gpg-auto-import-keys refresh 'Zabbix Official Repository'

# Set the repository to auto-refresh to ensure it's always up to date
zypper modifyrepo --refresh 'Zabbix Official Repository'
Ubuntu
This will refresh the repository metadata and prepare the system for Zabbix installation.
What is a repository?
A repository in Linux is a configuration that allows you to access and install software packages. You can think of it like an "app store" where you find and download software from a trusted source, in this case, the Zabbix repository. Many repositories are available, but it's important to only add those you trust. The safest practice is to stick to the repositories provided by your operating system and only add additional ones when you're sure they are both trusted and necessary.
For our installation, the Zabbix repository is provided by the vendor itself, making it a trusted source. Another popular and safe repository for Red Hat-based systems is EPEL (Extra Packages for Enterprise Linux), which is commonly used in enterprise environments. However, always exercise caution when adding new repositories to ensure system security and stability.
Installation and configuration of Zabbix server
Now that we've added the Zabbix repository with the necessary software, we are ready to install both the Zabbix server and the web server. Keep in mind that the web server doesn't need to be installed on the same machine as the Zabbix server; they can be hosted on separate systems if desired.
To install the Zabbix server components, run the following command:
Install the zabbix server
Red Hat
# For MySQL/MariaDB backend:
dnf install zabbix-server-mysql
# For PostgreSQL backend:
dnf install zabbix-server-pgsql
SUSE
# For MySQL/MariaDB backend:
zypper install zabbix-server-mysql
# For PostgreSQL backend:
zypper install zabbix-server-pgsql
Ubuntu
After successfully installing the Zabbix server package, we need to configure the Zabbix server to connect to the database. This requires modifying the Zabbix server configuration file.
The Zabbix server configuration file offers an option to include additional configuration files for custom parameters. For a production environment, it's often best to avoid altering the original configuration file directly. Instead, you can create and include separate configuration files for any additional or modified parameters. This approach ensures that your original configuration file remains untouched, which is particularly useful when performing upgrades or managing configurations with tools like Ansible, Puppet, or SaltStack.
On SUSE 16 and later, this feature is already enabled and configured by default.
(see also SUSE
documentation).
Hence, on SUSE systems, the Zabbix server configuration file is located at
/usr/etc/zabbix/zabbix_server.conf, and it is set up to include all .conf
files from the /etc/zabbix_server/zabbix_server.d/ directory.
On other distributions, you may need to enable it manually:
To enable this feature, ensure the next line exists and is not commented (with a
# in front of it) in /etc/zabbix/zabbix_server.conf:
The path /etc/zabbix/zabbix_server.d/ should already be created by the
installed package, but ensure it really exists.
Now we will create a custom configuration file database.conf in the
/etc/zabbix/zabbix_server.d/ directory that will hold our database connection
settings:
Add Zabbix database connection settings
Add the following lines in the configuration file to match your database setup:
Replace <database-host>, <database-name>, <database-schema>,
<database-user>, <database-password>, and <database-port> with the
appropriate values for your setup. This ensures that the Zabbix server can
communicate with your database.
Ensure that there is no # (comment symbol) in front of the configuration
parameters, as Zabbix will treat lines beginning with # as comments, ignoring
them during execution. Additionally, double-check for duplicate configuration
lines; if there are multiple lines with the same parameter, Zabbix will use the
value from the last occurrence.
For our setup, the configuration will look like this:
Example database.conf
MariaDB/MySQL:
# MariaDB database configuration
DBHost=<ip or dns of your MariaDB server>
DBName=zabbix
DBUser=zabbix-srv
DBPassword=<your super secret password>
DBPort=3306
PostgreSQL:
In this example:
- DBHost refers to the host where your database is running (use localhost if it's on the same machine).
- DBName is the name of the Zabbix database.
- DBSchema is the schema name used in PostgreSQL (only needed for PostgreSQL).
- DBUser is the database user.
- DBPassword is the password for the database user.
- DBPort is the port number on which your database server is listening (default for MySQL/MariaDB is 3306 and PostgreSQL is 5432).
Make sure the settings reflect your environment's database configuration.
Populate the Zabbix database instance
During the installation of the database software earlier, we created the necessary users and database for Zabbix, however, Zabbix expects certain tables, schemas, images, and other elements to be present in the database. To set up the database correctly, we need to populate it with the required schema.
Execute next steps on the machine where the database is installed.
Note
If this is not the same machine as the Zabbix server, you will need to install the Zabbix repository on the database server to gain access to the necessary SQL scripts. Refer to Install the Zabbix repository for instructions on adding the Zabbix repository also in this system.
When the repository is added we can install the package:
Install SQL scripts
Red Hat
SUSE
Ubuntu
Tip
If you have already installed the Zabbix server package on this machine,
the SQL scripts package may already be installed as a dependency.
You can verify this by checking if the /usr/share/zabbix/sql-scripts/
directory exists on your system.
Populate MariaDB/MySQL Database
Warning
When using a recent version of MySQL or MariaDB as the database backend for
Zabbix, you may encounter issues related to the creation of triggers during
the schema import process. This is particularly relevant if binary logging
is enabled on your database server. (Binary logging is often enabled by default)
To address this, you need to set the log_bin_trust_function_creators option to 1
in the MySQL/MariaDB configuration file or temporarily at runtime.
This allows non-root users to create stored functions and triggers without requiring
SUPER privileges, which are restricted when binary logging is enabled.
Normally we won't need the setting after the initial import of the Zabbix schema is done, so we will disable it again after the import is complete.
Now lets upload the data from zabbix (db structure, images, user, ... ) for this
we make use of the user zabbix-srv and we upload it all in our DB zabbix.
Populate the database
Warning
Depending on the speed of your hardware or virtual machine, the process may take anywhere from a few seconds to several minutes without any visual feedback after entering the root password.
Please be patient and avoid cancelling the operation; just wait for the linux prompt to reappear.
Note
Zabbix seems to like to change the locations of the script to populate the DB every version or even in between versions. If you encounter an error take a look at the Zabbix documentation, there is a good chance that some location was changed.
Once the import of the Zabbix schema is complete, you should no longer need the
log_bin_trust_function_creators global parameter. It is a good practice to
remove it for security reasons.
To revert the global parameter back to 0, use the following command in the MySQL/MariaDB shell:
Disable function log_bin_trust again
This command will disable the setting, ensuring that the servers security posture remains robust.
Populate the PostgreSQL Database
First you need to prepare the database schema: unzip the necessary schema files by running the following command:
Unzip the DB patch
Red Hat / SUSE
Ubuntu
Note
Zabbix seems to like to change the locations of the script to populate the DB every version or even in between versions. If you encounter an error take a look at the Zabbix documentation, there is a good chance that some location was changed.
This will extract the database schema required for the Zabbix server.
Next we will execute the SQL file to populate the database. Open a psql shell:
Ensure correct search_path is set
Make sure you performed previous steps as outlined in Creating the Zabbix database instance with PostgreSQL
carefully so that you have set the correct search_path.
If you did not set the default search_path for the zabbix-srv user,
ensure you set it manually in the current session before proceeding:
Now run the following commands:
Warning
Depending on your hardware or VM performance, this process can take anywhere from a few seconds to several minutes. Please be patient and avoid cancelling the operation.
Monitor the progress as the script runs. You will see output similar to:
Output example
Once the script completes and you return to the zabbix=> prompt, the database
should be successfully populated with all the required tables, schemas, images,
and other elements needed for Zabbix.
However, zabbix-web still cannot perform any operations on the tables or
sequences. To allow basic data interaction without giving too many privileges,
grant the following permissions:
- For tables: SELECT, INSERT, UPDATE, and DELETE.
- For sequences: SELECT and UPDATE.
Grant rights on the schema to user zabbix-web
Verify if the rights are correct on the schema :
Example schema rights
zabbix=> \dn+
                                           List of schemas
     Name      |       Owner       |           Access privileges            |      Description
---------------+-------------------+----------------------------------------+------------------------
 public        | pg_database_owner | pg_database_owner=UC/pg_database_owner+| standard public schema
               |                   | =U/pg_database_owner                   |
 zabbix_server | zabbix-srv        | "zabbix-srv"=UC/"zabbix-srv"          +|
               |                   | "zabbix-web"=U/"zabbix-srv"            |
Note
If you encounter the following error during the SQL import:
vbnet psql:/usr/share/zabbix/sql-scripts/postgresql/server.sql:7: ERROR: no
    schema has been selected to create in
It indicates that the search_path setting
might not have been correctly applied. This setting is crucial because it specifies
the schema where the tables and other objects should be created. By correctly
setting the search path, you ensure that the SQL script will create tables
and other objects in the intended schema.
To ensure that the Zabbix tables were created successfully and have the correct
permissions, you can verify the table list and their ownership using the psql
command:
- List the Tables: Use the following command to list all tables in the
zabbix_serverschema:
You should see a list of tables with their schema, name, type, and owner. For example:
List table with relations
zabbix=> \dt
                        List of relations
    Schema     |            Name            | Type  |   Owner
---------------+----------------------------+-------+------------
 zabbix_server | acknowledges               | table | zabbix-srv
 zabbix_server | actions                    | table | zabbix-srv
 zabbix_server | alerts                     | table | zabbix-srv
 zabbix_server | auditlog                   | table | zabbix-srv
 zabbix_server | autoreg_host               | table | zabbix-srv
 zabbix_server | changelog                  | table | zabbix-srv
 zabbix_server | conditions                 | table | zabbix-srv
...
...
...
 zabbix_server | valuemap                   | table | zabbix-srv
 zabbix_server | valuemap_mapping           | table | zabbix-srv
 zabbix_server | widget                     | table | zabbix-srv
 zabbix_server | widget_field               | table | zabbix-srv
(203 rows)
- Verify Permissions: Confirm that the zabbix-srv user owns the tables and has the necessary permissions. You can check permissions for specific tables using the \dp command:
Example output
zabbix=> \dp zabbix_server.*
                                                     Access privileges
    Schema     |            Name            |   Type   |         Access privileges          | Column privileges | Policies
---------------+----------------------------+----------+------------------------------------+-------------------+----------
 zabbix_server | acknowledges               | table    | "zabbix-srv"=arwdDxtm/"zabbix-srv"+|                   |
               |                            |          | "zabbix-web"=arwd/"zabbix-srv"     |                   |
 zabbix_server | actions                    | table    | "zabbix-srv"=arwdDxtm/"zabbix-srv"+|                   |
               |                            |          | "zabbix-web"=arwd/"zabbix-srv"     |                   |
 zabbix_server | alerts                     | table    | "zabbix-srv"=arwdDxtm/"zabbix-srv"+|                   |
               |                            |          | "zabbix-web"=arwd/"zabbix-srv"     |                   |
 zabbix_server | auditlog                   | table    | "zabbix-srv"=arwdDxtm/"zabbix-srv"+|                   |
This will display the access privileges for all tables in the zabbix_server
schema. Ensure that zabbix-srv has the required privileges.
If everything looks correct, your tables are properly created and the
zabbix-srv user has the appropriate ownership and permissions. If you need to
adjust any permissions, you can do so using the GRANT commands as needed.
Configure firewall to allow Zabbix trapper connections
Back on your Zabbix server machine, we need to ensure that the firewall is configured to allow incoming connections to the Zabbix server.
Your Zabbix server needs to accept incoming connections from Zabbix agents,
senders, and proxies. By default, Zabbix uses port 10051/tcp for these
connections. To allow these connections, you need to open this port in your
firewall.
Open firewall for zabbix-trapper
Red Hat / SUSE
Ubuntu
If the service is not recognized using firewall-cmd --add-service, you can
manually specify the port:
Starting the Zabbix server
With the Zabbix server configuration updated to connect to your database, you can now start and enable the Zabbix server service. Run the following command to enable the Zabbix server and ensure it starts automatically on boot:
Note
Before restarting the Zabbix server after modifying its configuration, it is
considered best practice to validate the configuration to prevent potential
issues. Running a configuration check ensures that any errors are detected
beforehand, avoiding downtime caused by an invalid configuration. This can
be accomplished using the following command: zabbix-server -T
Enable and start zabbix-server service
Red Hat, SUSE and Ubuntu
This command will start the Zabbix server service immediately and configure it
to launch on system startup. To verify that the Zabbix server is running
correctly, check the log file for any messages. You can view the latest entries
in the Zabbix server log file using:
Look for messages indicating that the server has started successfully. If there are any issues, the log file will provide details to help with troubleshooting.
Example output
12074:20250225:145333.529 Starting Zabbix Server. Zabbix 7.2.4 (revision c34078a4563).
12074:20250225:145333.530 ****** Enabled features ******
12074:20250225:145333.530 SNMP monitoring:           YES
12074:20250225:145333.530 IPMI monitoring:           YES
12074:20250225:145333.530 Web monitoring:            YES
12074:20250225:145333.530 VMware monitoring:         YES
12074:20250225:145333.530 SMTP authentication:       YES
12074:20250225:145333.530 ODBC:                      YES
12074:20250225:145333.530 SSH support:               YES
12074:20250225:145333.530 IPv6 support:              YES
12074:20250225:145333.530 TLS support:               YES
12074:20250225:145333.530 ******************************
12074:20250225:145333.530 using configuration file: /etc/zabbix/zabbix_server.conf
12074:20250225:145333.545 current database version (mandatory/optional): 07020000/07020000
12074:20250225:145333.545 required mandatory version: 07020000
12075:20250225:145333.557 starting HA manager
12075:20250225:145333.566 HA manager started in active mode
12074:20250225:145333.567 server #0 started [main process]
12076:20250225:145333.567 server #1 started [service manager #1]
12077:20250225:145333.567 server #2 started [configuration syncer #1]
12078:20250225:145333.718 server #3 started [alert manager #1]
12079:20250225:145333.719 server #4 started [alerter #1]
12080:20250225:145333.719 server #5 started [alerter #2]
12081:20250225:145333.719 server #6 started [alerter #3]
12082:20250225:145333.719 server #7 started [preprocessing manager #1]
12083:20250225:145333.719 server #8 started [lld manager #1]
If there was an error and the server was not able to connect to the database you would see something like this in the server log file :
Example log with errors
12068:20250225:145309.018 Starting Zabbix Server. Zabbix 7.2.4 (revision c34078a4563).
12068:20250225:145309.018 ****** Enabled features ******
12068:20250225:145309.018 SNMP monitoring:           YES
12068:20250225:145309.018 IPMI monitoring:           YES
12068:20250225:145309.018 Web monitoring:            YES
12068:20250225:145309.018 VMware monitoring:         YES
12068:20250225:145309.018 SMTP authentication:       YES
12068:20250225:145309.018 ODBC:                      YES
12068:20250225:145309.018 SSH support:               YES
12068:20250225:145309.018 IPv6 support:              YES
12068:20250225:145309.018 TLS support:               YES
12068:20250225:145309.018 ******************************
12068:20250225:145309.018 using configuration file: /etc/zabbix/zabbix_server.conf
12068:20250225:145309.027 [Z3005] query failed: [1146] Table 'zabbix.users' doesn't exist [select userid from users limit 1]
12068:20250225:145309.027 cannot use database "zabbix": database is not a Zabbix database
If that is the case, double-check your database connection settings in the
/etc/zabbix/zabbix_server.d/database.conf file and ensure that the database is
properly populated as described in the previous steps. Also check firewall rules
and when using PostgreSQL make sure that pg_hba.conf is correctly configured
to allow connections from the Zabbix server.
Let's check the Zabbix server service to see if it's enabled so that it survives a reboot
???+ example "Example output" ```shell-session localhost:~> sudo systemctl status zabbix-server
● zabbix-server.service - Zabbix Server
     Loaded: loaded (/usr/lib/systemd/system/zabbix-server.service; enabled; preset: disabled)
     Active: active (running) since Tue 2025-02-25 14:53:33 CET; 26min ago
   Main PID: 12074 (zabbix_server)
      Tasks: 77 (limit: 24744)
     Memory: 71.5M
        CPU: 18.535s
     CGroup: /system.slice/zabbix-server.service
             ├─12074 /usr/sbin/zabbix_server -c /etc/zabbix/zabbix_server.conf
             ├─12075 "/usr/sbin/zabbix_server: ha manager"
             ├─12076 "/usr/sbin/zabbix_server: service manager #1 [processed 0 events, updated 0 event tags, deleted 0 problems, synced 0 service updates, idle 5.027667 sec during 5.042628 sec]"
             ├─12077 "/usr/sbin/zabbix_server: configuration syncer [synced configuration in 0.051345 sec, idle 10 sec]"
             ├─12078 "/usr/sbin/zabbix_server: alert manager #1 [sent 0, failed 0 alerts, idle 5.030391 sec during 5.031944 sec]"
             ├─12079 "/usr/sbin/zabbix_server: alerter #1 started"
             ├─12080 "/usr/sbin/zabbix_server: alerter #2 started"
             ├─12081 "/usr/sbin/zabbix_server: alerter #3 started"
             ├─12082 "/usr/sbin/zabbix_server: preprocessing manager #1 [queued 0, processed 0 values, idle 5.023818 sec during 5.024830 sec]"
             ├─12083 "/usr/sbin/zabbix_server: lld manager #1 [processed 0 LLD rules, idle 5.017278sec during 5.017574 sec]"
             ├─12084 "/usr/sbin/zabbix_server: lld worker #1 [processed 1 LLD rules, idle 21.031209 sec during 21.063879 sec]"
             ├─12085 "/usr/sbin/zabbix_server: lld worker #2 [processed 1 LLD rules, idle 43.195541 sec during 43.227934 sec]"
             ├─12086 "/usr/sbin/zabbix_server: housekeeper [startup idle for 30 minutes]"
             ├─12087 "/usr/sbin/zabbix_server: timer #1 [updated 0 hosts, suppressed 0 events in 0.017595 sec, idle 59 sec]"
             ├─12088 "/usr/sbin/zabbix_server: http poller #1 [got 0 values in 0.000071 sec, idle 5 sec]"
             ├─12089 "/usr/sbin/zabbix_server: browser poller #1 [got 0 values in 0.000066 sec, idle 5 sec]"
             ├─12090 "/usr/sbin/zabbix_server: discovery manager #1 [processing 0 rules, 0 unsaved checks]"
             ├─12091 "/usr/sbin/zabbix_server: history syncer #1 [processed 4 values, 3 triggers in 0.027382 sec, idle 1 sec]"
             ├─12092 "/usr/sbin/zabbix_server: history syncer #2 [processed 0 values, 0 triggers in 0.000077 sec, idle 1 sec]"
             ├─12093 "/usr/sbin/zabbix_server: history syncer #3 [processed 0 values, 0 triggers in 0.000076 sec, idle 1 sec]"
             ├─12094 "/usr/sbin/zabbix_server: history syncer #4 [processed 0 values, 0 triggers in 0.000020 sec, idle 1 sec]"
             ├─12095 "/usr/sbin/zabbix_server: escalator #1 [processed 0 escalations in 0.011627 sec, idle 3 sec]"
             ├─12096 "/usr/sbin/zabbix_server: proxy poller #1 [exchanged data with 0 proxies in 0.000081 sec, idle 5 sec]"
             ├─12097 "/usr/sbin/zabbix_server: self-monitoring [processed data in 0.000068 sec, idle 1 sec]"
```
This concludes our chapter on installing and configuring the Zabbix server.
Installing the frontend
Before configuring the Zabbix frontend, ensure the required packages are installed on your chosen frontend server. This server can be the same one where the Zabbix server packages were previously installed, or it can be a separate machine. Make sure the frontend machine is prepared as outlined in Preparing the server for Zabbix, and perform all subsequent steps on the server designated for the frontend.
Installing the frontend with NGINX
install frontend packages
Red Hat
# When using MySQL/MariaDB
dnf install zabbix-nginx-conf zabbix-web-mysql
# or when using PostgreSQL
dnf install zabbix-nginx-conf zabbix-web-pgsql
# When using MySQL/MariaDB
zypper install zabbix-nginx-conf zabbix-web-mysql php8-openssl php8-xmlreader php8-xmlwriter
# or when using PostgreSQL
zypper install zabbix-nginx-conf zabbix-web-pgsql php8-openssl php8-xmlreader php8-xmlwriter
Suse Linux Enterprise Server
On SUSE Linux Enterprise Server (SLES), ensure you are subscribed to the
"SUSE Linux Enterprise Module Web and Scripting" repository to access
the necessary PHP 8 packages required for the Zabbix frontend installation:
(on SLES versions < 16, the command is "SUSEConnect" instead of "suseconnect")
Ubuntu
This command will install the front-end packages along with the required dependencies for Nginx.
As of SUSE 16 SELinux is now the default security module instead of AppArmor. By default PHP-FPM is not allowed by SELinux on SUSE to - map exec memory required for PHP JIT compilation, - connect to Zabbix server or - connect to the database server over TCP. We need to tell SELinux to allow all this:
SELinux: Allow PHP-FPM to map exec memory
Tip
To troubleshoot SELinux issues, it is recommended to install the setroubleshoot
package which will log any SELinux denials in the system log and provide
suggestions on how to resolve them.
Depending on your Linux distribution defaults, PHP-FPM may by default not be
allowed by SystemD to write to the /etc/zabbix/web directory required for the
Zabbix frontend setup. To enable this we need to create a drop-in file to allow
this:
SystemD: Allow PHP-FPM to write to /etc/zabbix/web
This will open an editor to create a drop-in file /etc/systemd/system/php-fpm.service.d/override.conf
which will override or extend the existing service file.
Add the following lines to the file:
Then exit the editor and reload the SystemD configuration:
How is SystemD preventing PHP-FPM from writing to /etc/zabbix/web?
On many modern Linux distributions, SystemD employs a security feature known as
sandboxing to restrict the capabilities of services. This is done to enhance
security by limiting the access of services to only the resources they need to function.
By default, PHP-FPM may be restricted from writing to certain directories,
including /etc/zabbix/web, to prevent potential security vulnerabilities.
This is enforced through SystemD's ProtectSystem and ReadWritePaths directives, which
control the file system access of services.
Tip
Normally write access to /etc/zabbix/web is only needed during the initial setup
of the Zabbix frontend. After the setup is complete you can remove the drop-in
file again to further harden the security of your system.
First thing we have to do is alter the Nginx configuration file so that we don't use the standard config and serve the Zabbix frontend on port 80.
In this configuration file look for the following block that starts with server
{:
Original config
Tip
This block may be different depending on your distribution and Nginx version.
Then, comment out the any listen and server_name directives to disable the
default http server configuration. You can do this by adding a # at the
beginning of each line, like in the example below:
The Zabbix configuration file must now be modified to take over the default service on port 80 we just disabled. Open the following file for editing:
And alter the following lines:
Original config
Remove the # in front of the first 2 lines and modify them with the correct
port and domain for your front-end.
Tip
In case you don't have a domain you can replace servername with _
like in the example below:
The web server and PHP-FPM service are now ready for activation and persistent startup. Execute the following commands to enable and start them immediately:
Restart the front-end services
Red Hat / SUSE
Ubuntu
Let's verify if the service is properly started and enabled so that it survives our reboot next time.
Example output
localhost:~> sudo systemctl status nginx
● nginx.service - The nginx HTTP and reverse proxy server
      Loaded: loaded (/usr/lib/systemd/system/nginx.service; enabled; preset: disabled)
     Drop-In: /usr/lib/systemd/system/nginx.service.d
              └─php-fpm.conf
      Active: active (running) since Mon 2023-11-20 11:42:18 CET; 30min ago
    Main PID: 1206 (nginx)
       Tasks: 2 (limit: 12344)
      Memory: 4.8M
         CPU: 38ms
      CGroup: /system.slice/nginx.service
              ├─1206 "nginx: master process /usr/sbin/nginx"
              └─1207 "nginx: worker process"

Nov 20 11:42:18 zabbix-srv systemd[1]: Starting The nginx HTTP and reverse proxy server...
Nov 20 11:42:18 zabbix-srv nginx[1204]: nginx: the configuration file /etc/nginx/nginx.conf syntax is ok
Nov 20 11:42:18 zabbix-srv nginx[1204]: nginx: configuration file /etc/nginx/nginx.conf test is successful
Nov 20 11:42:18 zabbix-srv systemd[1]: Started The nginx HTTP and reverse proxy server.
With the service operational and configured for automatic startup, the final preparatory step involves adjusting the firewall to permit inbound HTTP traffic. Execute the following commands:
Configure the firewall
Red Hat / SUSE
Ubuntu
Open your browser and go to the url or ip of your front-end :
If all goes well you should be greeted with a Zabbix welcome page. In case you
have an error check the configuration again or have a look at the nginx log file
/var/log/nginx/error.log or run the following command :
This should help you in locating the errors you made.
Upon accessing the appropriate URL, a page resembling the one illustrated below should appear:
1.4 Zabbix welcome
The Zabbix frontend presents a limited array of available localizations, as shown.
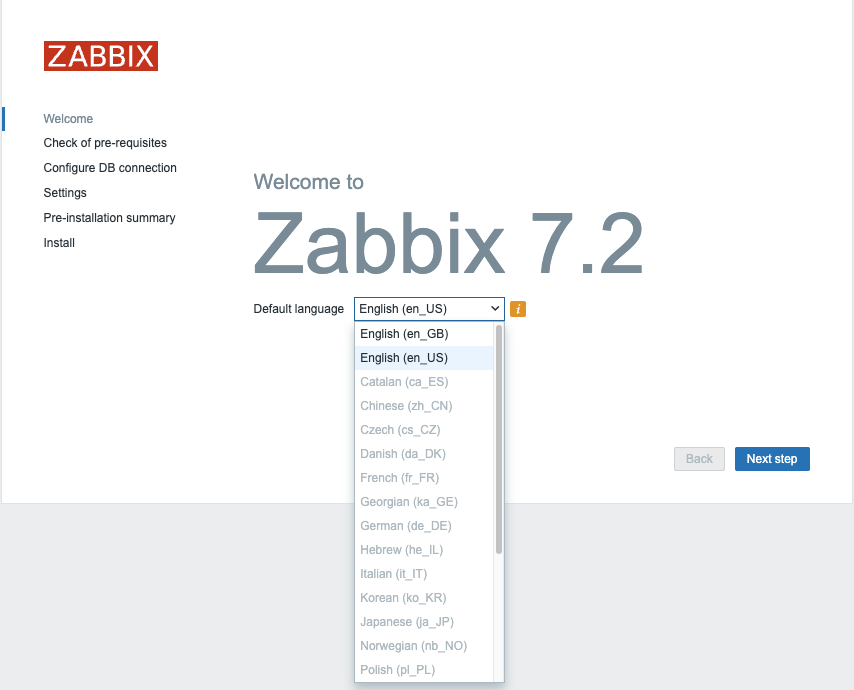
!.5 Zabbix welcome language choice
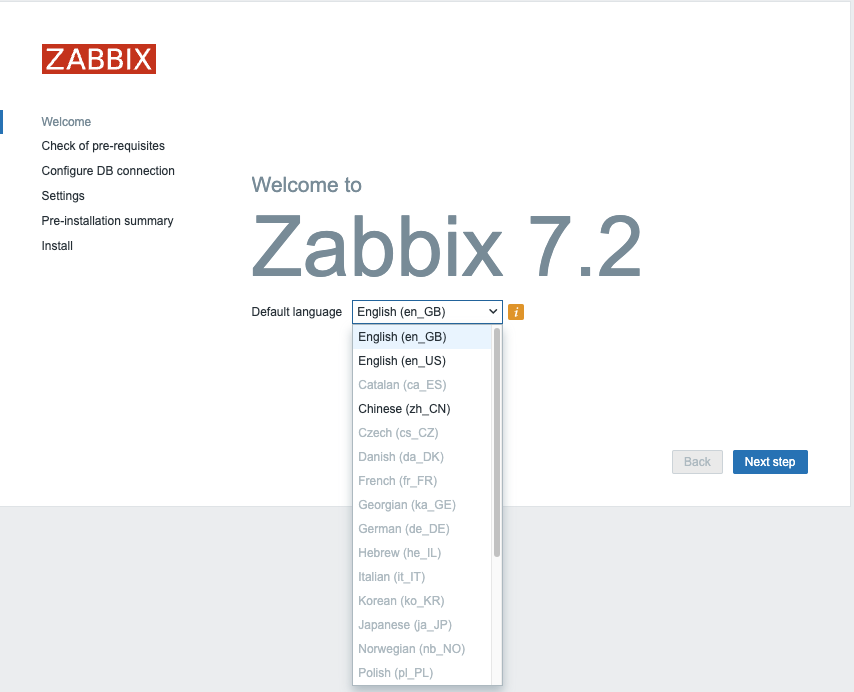
What if we want to install Chinese as language or another language from the list? Run the next command to get a list of all locales available for your OS.
Install language packs
Red Hat
SUSE
Ubuntu
Users on Ubuntu will probably notice following error `"Locale for language "en_US" is not found on the web server."``
This can be solved easy with the following commands.
This will give you a list like:
Example output
Red Hat
Installed Packages
glibc-langpack-en.x86_64
Available Packages
glibc-langpack-aa.x86_64
---
glibc-langpack-zu.x86_64
SUSE
Ubuntu
language-pack-kab - translation updates for language Kabyle
language-pack-kab-base - translations for language Kabyle
language-pack-kn - translation updates for language Kannada
language-pack-kn-base - translations for language Kannada
---
language-pack-ko - translation updates for language Korean
language-pack-ko-base - translations for language Korean
language-pack-ku - translation updates for language Kurdish
language-pack-ku-base - translations for language Kurdish
language-pack-lt - translation updates for language Lithuanian
Let's search for our Chinese locale to see if it is available. As you can see the code starts with zh.
search for language pack
Red Hat
SUSE
Ubuntu
On RedHat and Ubuntu, the command outputs two lines; however, given the
identified language code, 'zh_CN,' only the first package requires installation.
on SUSE either only locales C.UTF-8 and en_US.UTF-8 are install or all
available locales are installed, depending on whether the package glibc-locale
is installed or not.
Install the locale package
Red Hat
SUSE
Ubuntu
When we return now to our front-end we are able to select the Chinese language, after a reload of our browser.
1.6 Zabbix select language
Note
If your preferred language is not available in the Zabbix front-end, don't worry, it simply means that the translation is either incomplete or not yet available. Zabbix is an open-source project that relies on community contributions for translations, so you can help improve it by contributing your own translations.
Visit the translation page at https://translate.zabbix.com/ to assist with the translation efforts. Once your translation is complete and reviewed, it will be included in the next minor patch version of Zabbix. Your contributions help make Zabbix more accessible and improve the overall user experience for everyone.
When you're satisfied with the available translations, click Next. You will
then be taken to a screen to verify that all prerequisites are satisfied. If any
prerequisites are not fulfilled, address those issues first. However, if
everything is in order, you should be able to proceed by clicking Next.
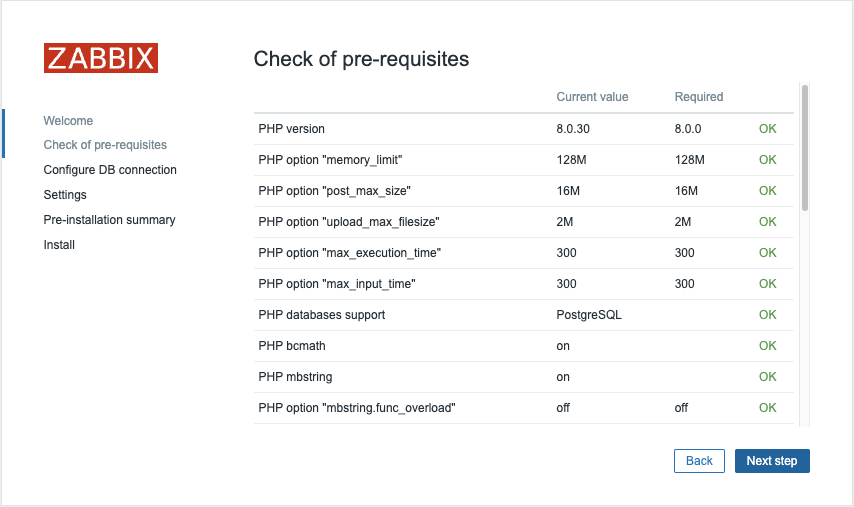
1.7 Zabbix pre-requisites
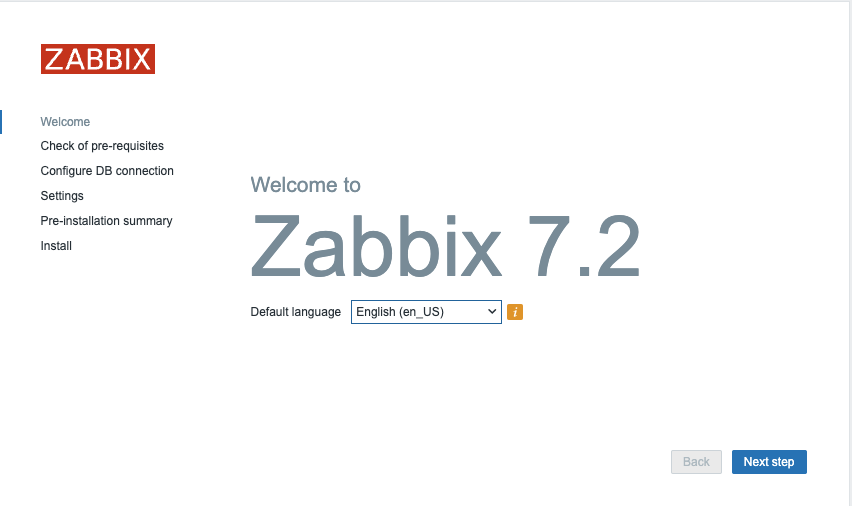
On the next page, you'll configure the database connection parameters:
Select the Database Type: Choose either MySQL or PostgreSQL depending on your setup.Enter the Database Host: Provide the IP address or DNS name of your database server. Use port 3306 for MariaDB/MySQL or 5432 for PostgreSQL.Enter the Database Name: Specify the name of your database. In our case, it is zabbix. If you are using PostgreSQL, you will also need to provide the schema name, which is zabbix_server in our case.Enther the Database Schema: Only for PostgreSQL users, enter the schema name created for Zabbix server, which iszabbix_serverin our case.Enter the Database User: Input the database user created for the web front-end, remember in our basic installation guide we created 2 userszabbix-webandzabbix-srv. One for the frontend and the other one for our zabbix server so here we will use the userzabbix-web. Enter the corresponding password for this user.
Ensure that the Database TLS encryption option is not selected, and then click
Next step to proceed.
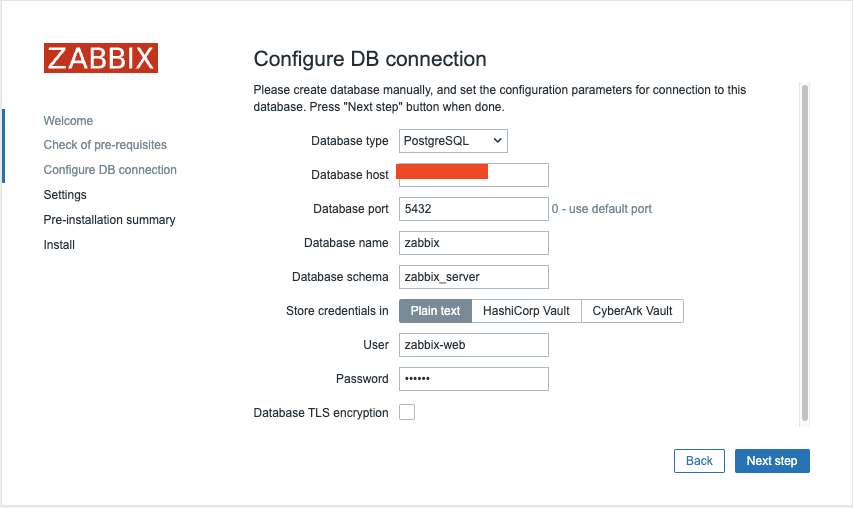
1.8 Zabbix connections
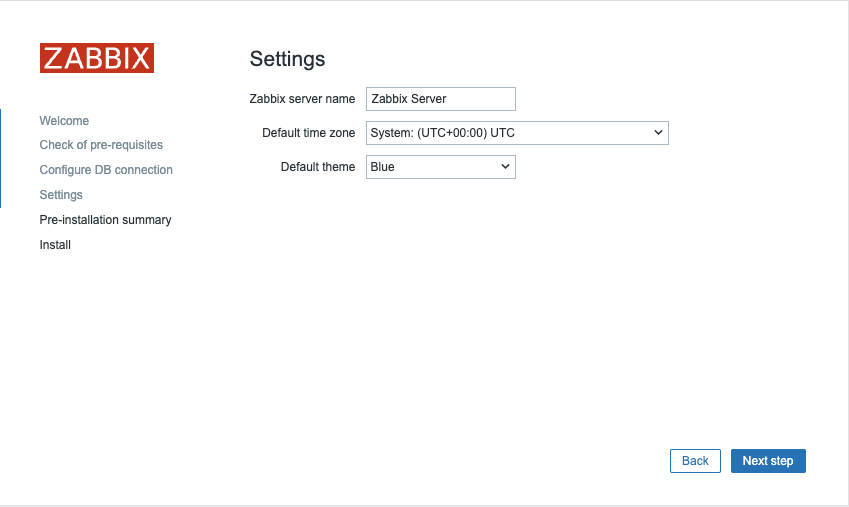
You're almost finished with the setup! The final steps involve:
Assigning an Instance Name: Choose a descriptive name for your Zabbix instance.Selecting the Timezone: Choose the timezone that matches your location or your preferred time zone for the Zabbix interface.Setting the Default Time Format: Select the default time format you prefer to use.- Encrypt connections from Web interface: I marked this box but you should not. This box is to encrypt communications between Zabbix frontend and your browser. We will cover this later. Once these settings are configured, you can complete the setup and proceed with any final configuration steps as needed.
Note
It's a good practice to set your Zabbix server to the UTC timezone, especially when managing systems across multiple timezones. Using UTC helps ensure consistency in time-sensitive actions and events, as the server’s timezone is often used for calculating and displaying time-related information.
1.9 Zabbix summary
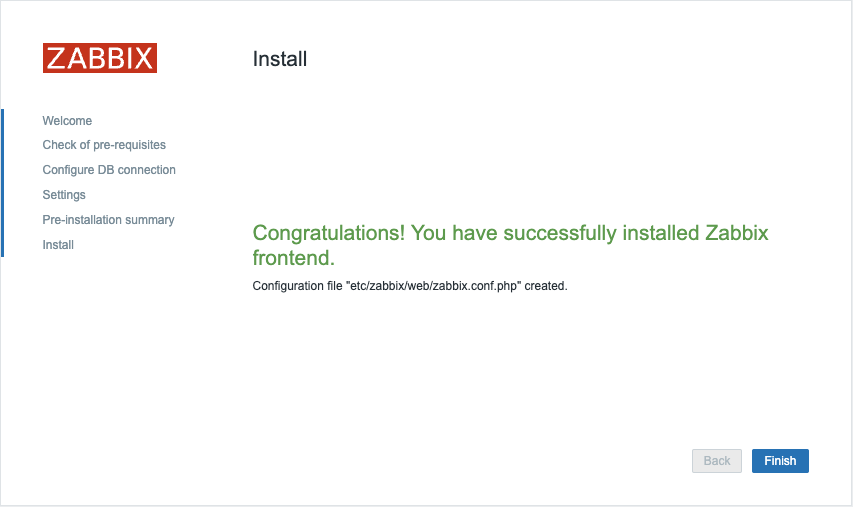
After clicking Next step again, you'll be taken to a page confirming that the
configuration was successful. Click Finish to complete the setup process.
1.10 Zabbix install
We are now ready to login :
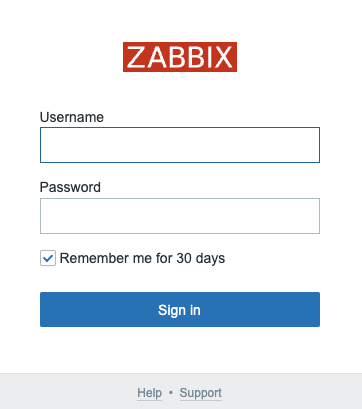
1.11 Zabbix login
- Login : Admin
- Password : zabbix
This concludes our topic on setting up the Zabbix server. If you're interested in securing your front-end, I recommend checking out the topic Securing Zabbix for additional guidance and best practices.
Note
If you are not able to safe your configuration at the end make sure SeLinux is disabled. It is possible that it will block access to certain files or even the database.
Conclusion
With this, we conclude our journey through setting up Zabbix and configuring it with MySQL or PostgreSQL on RHEL or SUSE-based systems or Ubuntu. We have walked through the essential steps of preparing the environment, installing the necessary components, and ensuring a fully functional Zabbix server. From database selection to web frontend configuration with Nginx, each decision has been aimed at creating a robust and efficient monitoring solution.
At this stage, your Zabbix instance is operational, providing the foundation for advanced monitoring and alerting. In the upcoming chapters, we will delve into fine-tuning Zabbix, optimizing performance, and exploring key features that transform it into a powerful observability platform.
Now that your Zabbix environment is up and running, let’s take it to the next level.
Questions
- Should I choose MySQL or PostgreSQL as the database back-end? Why?
- What version of Zabbix should I install for compatibility and stability?
- What port does my DB use ?
- What Zabbix logs should I check for troubleshooting common issues?
Useful URLs
- https://en.opensuse.org/SDB:PostgreSQL
- https://help.ubuntu.com/community/PostgreSQL
- https://www.postgresql.org/docs/current/ddl-priv.html
- https://www.zabbix.com/download
- https://www.zabbix.com/documentation/current/en/manual
- https://www.zabbix.com/documentation/current/en/manual/installation/requirements
- https://www.zabbix.com/documentation/current/en/manual/installation/install_from_packages